robdyck
-
Posts
4933 -
Joined
-
Last visited
Content Type
Profiles
Forums
Gallery
Everything posted by robdyck
-
One of the cleanest ways I can quickly come up with is to add wall coverings to rooms. Of course, the wall covering height and elevation needs to be specified manually. Follow this by editing the component for the wall covering (I chose ID: General and Accounting Code: 5300 - Painting Interior). Then, create a materials list polyline on a per room room basis or apply the wall covering to as many rooms as needed. Keep in mind that Rooms don't report to the materials list, so if multiple rooms are included in the mat. list, you can't really identify the source of each paint material, unless you can figure out a macro to place in one of the available component fields that will report the name (I haven't figured that out). Of course, you can manually enter the room name in one of the available fields. But, this will allow you to create a material list for that category only by choosing which columns to include.
-
Your best bet is to look through the Armstrong Flooring catalog. If you don't have it, you can download by following the link below. https://www.chiefarchitect.com/3d-library/index.php?r=site/detail/709
-
 Try making the same drawer using framing members. Just model it 'flat' in plan view (this will give you the mitering option). Then convert to symbol and rotate as needed. It might also be a material mapping issue after the symbol is created. Can you post an empty plan with the 3d solids as well as the completed drawer front?
 -
All you need to do is select a molding profile for the interior sill from the library. That will provide a separate field for the Interior Sill Molding in the Materials Tab. Unfortunately, this profile needs to be the correct size in the library and even then, it will build to the bottom of the window frame. AFAIK, There is no setting to adjust the reveal of a window sill.
-

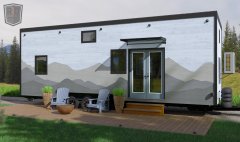
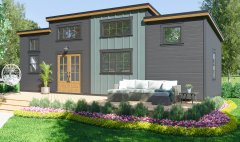
From the album: Tiny Homes
-
A collection of tiny homes, some with trailers and some without. Enjoy!
-
-
Material wanted: salt and pepper ground concrete (for floor)
robdyck replied to GeneDavis's topic in General Q & A
I also noticed it's not there anymore. But, there are higher res images available at Boral's website. -
Material wanted: salt and pepper ground concrete (for floor)
robdyck replied to GeneDavis's topic in General Q & A
X16 Library Material: Ebonite.calibz -
Material wanted: salt and pepper ground concrete (for floor)
robdyck replied to GeneDavis's topic in General Q & A
Boral / Boralstone / Ebonite -
Unless the items are very project specific and are unlikely to have future use, I recommend creating them in their own plan file and folder, just like you would with 2D details.
-
I think you have the wrong layers displayed for that function. If you have Walls, Layers turned off and if you do NOT have Walls, Main Layer Only turned ON, you cannot manually hit the wall main layer. That's what I think is going on there, but I could be wrong. Changing the layer display will not affect the extension of existing dimensions but it does affect the interaction of new dimensions.
-
Can the Roof Fascia and Shadow board line up at the top?
robdyck replied to PitMan71's topic in General Q & A
Use a stacked molding for the shadow board.. Set the fascia thickness to 1/16" or turn it off. -
@JKEdmoYes, I thought so too...I've used it before. For some reason I couldn't find it so I just went with the 3d warehouse link. I browsed the Kohler library when I should have used a search!
-
The product shown is a Kohler Brockway 36" Wall-mount utility sink. https://3dwarehouse.sketchup.com/search/models?q=BROCKWAY
-
Is there a way to turn off or ignore elevation points?
robdyck replied to cbucks's topic in General Q & A
You'll need to remove those elevation points. One way to keep track of this would be to place a text marker in the same location, manually enter the information for reference, and then delete the unneeded elevation points. -
Material Fill Pattern to CAD Polyline Fill Pattern
robdyck replied to JKEdmo's topic in General Q & A
Yes, an 'Add to Library' button would be great, or those patterns in use could just show up in the drop down list. -
Material Fill Pattern to CAD Polyline Fill Pattern
robdyck replied to JKEdmo's topic in General Q & A
So did I! I'd never actually done that before. -
Material Fill Pattern to CAD Polyline Fill Pattern
robdyck replied to JKEdmo's topic in General Q & A
Oh, and don't forget to check the pattern scale...it's 1.5 for your cad polylines. Looks like it works. -
Material Fill Pattern to CAD Polyline Fill Pattern
robdyck replied to JKEdmo's topic in General Q & A
Add the Material to your library. From the library, right click the material and select edit pattern. Marquee select the highlighted area and press ctrl-c. Back in plan view, go to CAD>Patterns>Create New Pattern. Name it and make it the same size (32"x32"). When the window opens, Press ctrl-alt-v (paste-in-place). Close the window and choose Save. -
Assuming you make this floor joist depth change correctly, you won't have to worry about ceiling heights as they will move with the floor structure. You WILL need to manually move roof planes up the correct amount and this can be done in seconds by using the transform / replicate tool and moving them 4" up in the z-axis.
-
You could use a separate ceiling plane just for the tile finish or use a 3d solid.
-
And what's up with the constant re-appearance of point markers in a CAD detail?!
-
Yes. I think this is related to the 3d text feature. I have text and text notes in all my elevation views in my template plan. When I open those views and then edit a text box, the leader line jumps, almost as though it is confused about which part of it is a tail or head. For this reason I make sure all arrows never connect to anything...ok not never but usually. Similar but different...you can't trust a dimension to a roof plane to be there for you later on. It seems that sooner or later, Chief rebuilds the roof and some dimensions disappear...and it's not like you get a tap on the shoulder that says, um, er, I threw out some important information, were you still using that? Oh wait, how about a warning that shows you exactly what Chief has deleted through an auto-rebuild function...or whatever it is that causes that to happen?
-
-
You'll be able to pull all the images you need to easily make a seamless texture image from this site. Just browse the images and take what you need. https://www.homedepot.ca/product/floorpops-12-inch-x-12-inch-neutral-bonneville-peel-and-stick-vinyl-tile-flooring-20-sq-ft-/1001867569