
robdyck
-
Posts
4988 -
Joined
-
Last visited
Content Type
Profiles
Forums
Gallery
Everything posted by robdyck
-
Paste the text below into a web search. Then follow some of the links to find out which converter works for you. DBF, PRJ, SBN, SBX, SHP and SHX convert to gpx
-
 Try 2 different schedules and adjust which columns are included. Make sure you only use the callout and/or labels from your main cabinet schedule.
 -
No. These are essentially conjoined twins, except that you can choose which one you want to see.
-
Pony Walls! Create your porch using a wall type for the stone. Add windows, not doorways, simply to be able to add the keystone > 'Treatments' / Millwork Above Casing. Position and size all windows; use a pass-through and remove frame and casing. Change walls to pony walls, with the lower wall being an air gap type of wall. Place columns manually.
-
Unfortunately, we can't hide a portion of the camera's cross section line. To represent a 'break' in the camera's section line in plan view (or other views), I can think of 2 options: Use a CAD Mask. This could be as simple as adding a white line to cover the section cut lines to control the visible extent of the camera's lines. Alignment of these lines is fairly simple if you are drawing on the grid with snapping enabled. It could also be a polyine with partially transparent fill.This approach is similar to adding a CAD box or polyline to represent a callout tail. Use a callout (or a pair of callouts). This approach is essentially the same as above...just different. Both approaches are manual and require 'maintenance' if the camera needs to be moved.
-
I'd suggest you examine the settings for the Floor Structure Definition. If it's checked as Trusses, the truss width is greyed out. Check Joists, change the width, then check trusses.
-
I agree! I needed the same thing the other day.
-
Hi Gary, all you need to do is create a stacked molding to serve as the top rail. Draw 2 polylines in the correct orientation, select both of them, and add to the library as a stacked molding. Then apply them to the top rail of your railing. TIP: In the library, you can open the object and assign a separate material to 1 of the moldings. This will give you the ability to assign different materials to them once they are in use.
-
There are several key settings that need to be addressed: Main Floor Platform: 4" concrete slab Foundation Defaults: Foundation Level: Uncheck 'Floor Under This Room' These settings should result in something like this:
-
And to keep it from coming back, check this box:
-
Auto build roof does not build over structure, but creates false roof
robdyck replied to Clark418's topic in General Q & A
You have a Baseline Polyline in your plan, it just isn't displayed in the working plan view nor in the roof plan view. Turn on the layer for Roofs, Baseline Polylines. Then, select and delete the roof baseline polyline. OR open the Build Roof Dialog and check Make Roof Baseline Polylines. This will generate a new baseline polyline and the correct roof, but it will not rebuild when walls are moved as that check box is not 'sticky'. Best to delete the baseline and don't use a baseline unless you understand its function and need it for roof edits. -
Have you tried renaming the file?
-
Random rotation, sizing adjustments, and spacing adjustments can be handled by using a distribution polyline or region. Cropping the symbols is not supported.
-
I would not expect a 180MB layout file to work well:( Without looking at the specific files, I'd suggest doing some very serious cleanup to drastically reduce file size. Of course, make sure you have the files backed up prior to doing this. I'd open only 1 file at a time and then start adjusting items that are causing file bloat. These could be items like live views, pdf or jpgs, complex cad fills in plan view, 3d objects, material textures and/or patterns, etc.
-
I use both methods as both methods have strengths and weaknesses. In both cases, I almost never run into any issues with windows, although there are some areas where wall connections are ridiculously time ocnsuming...usually when there are more than 2 walls present and I need a specific connections that Chief's wall layers want to override. That being said, there are methods to control these using various wall types (with or withour Room Definition) to help control the wall connections. And there are still some scneraios where I need to CAD fill a connection for proper plan view and manually finish ceilings and corners for proper 3d view. Rare, but they do happen. I've learned to accept it and cope with it as quickly as possible.
-
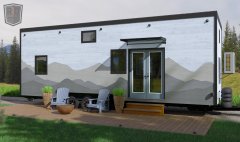
From the album: Tiny Homes
-
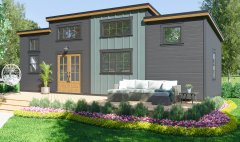
From the album: Tiny Homes
-
Select the wall or walls for the fireplace bumpout and find and select the setting for Balloon Through Ceiling Above. Those wall 'chunks' are probably improperly connected attic walls.
-
Assuming that your sloped ceiling is a ceiling plane (and not from the roof) you will also need a custom ceiling plane for the flat ceiling in order for the ceiling surfaces to join correctly. Alternatively, you can drag the top of the sloped ceiling a bit higher to avoid a vertical cut at the top of the sloped ceiling. A section view and cross section lines can help make this an exact process.
-
A 3d solid is the simplest. It's possible to do it with a wall but it won't necessarily be stable and it will take a very long time to get it exact. You may need to use 2 3d solids. 1 for the wallboard and 1 for the ceiling board.
-
Open the layout box and review the Linked View. That should point you in the right direction to either relink the view or remove that layout box from your layout page. You can also copy the missing cad detail to the linked plan and then relink that layout box.
-
The Core catalog has 3 shiplap materials with a wood appearance however they aren't great as they really don't look much like any type of wood, much less white oak. So if you can't find a suitable texture in any other catalog, you need to make your own texture by either replacing the texture file of one of the shiplap materials with a texture of an oak panel, or by using the normal map from Chief's material and adding that to a texture of oak. Keep in mind that the original wood texture file will need to be running horizontally to work with the Chief normal map. The texture file and normal map can't be rotated independent of each other using the adjust material tool. I quickly made a material which you can use or inspect to make your own material. SHIPLAP OAK.calibz
-
From the album: Tiny Homes
-
Another seemingly simple option would be for Chief to provide a default Attic Wall type. You'll notice my gable wall is setup to coordinate with a gable end truss...I also don't want 5.5" of framing, cad insulation boxes, or drywall in my trussed attic!


