

PMMully
-
Posts
255 -
Joined
-
Last visited
Content Type
Profiles
Forums
Gallery
Posts posted by PMMully
-
-
Hi all, in my area I have a lot of odd roof designs with hips, gables, and both, mixed with flat roofs. Most of these are covered porches with all sorts of oddities, that want to become fully closed in rooms, or have additions put on top of them. These were all conventionally framed houses back then.
I have a plan here that is very close to a real job. I got it all to work pretty well overall. It was actually harder to do than the real job because I used the original CA generated roof to start with and it did not have favorable ridges in comparison to the real job. I wound up making custom roof planes for the flat roof and others to tie it all in.
Couple of questions:
- I tried to get this to generate using many combinations of wall types on the porch, roof groups, etc., is where any chance this could ever be autogenerated? Update: I did not try baseline manipulations however.
- I got stumped on trying to create roof planes for the gable end of the main ridge. I was thinking of some sort of hip planes to form a ridge, or a (nearly) vertical roof section to form a gable. I had too much trouble with the thickness, facia, etc. The area is outlined in the attached pics and plan. I wound up using a polyline solid that I left as concrete to make it easily visible.
Any advice is appreciated in advance. Update: I guess it is really a reverse cricket, or a reverse hip? I have done crickets, not sure why my brain can not process this one.


-
Hi all,
Can these two settings, "Ceiling Height" and "Birdsmouth off Plate" adjustments be applied to selected roof planes, or just in the roof build? So far all I can find is the later, am I missing anything?
-
6 hours ago, mtldesigns said:
Gotcha.. I do show these kind of notes as well, I guess my "balloons and legend" are more in line with a bill of material kinda thing. Just got tired of leaders and text describing lap siding for example.
Perfect
") Generic stuff in Rich Text blocks, Notes schedule for plan specific stuff (repeatable across the plan) - less clutter, save time. Leaders only for very specific stuff to a page.
Generic stuff in Rich Text blocks, Notes schedule for plan specific stuff (repeatable across the plan) - less clutter, save time. Leaders only for very specific stuff to a page.
-
 1
1
-
-
6 hours ago, DavidJPotter said:
Using railing walls set to "Post to beam" works for simple porches but where you need more control over the posts or columns, I often just set the "Newels" to zero inches and then manually place my columns of posts from the LB - Millwork -Columns. The point is getting a product and not, as much what you did to achieve it IMHO.
DJP
Being fairly new in comparison to many of you on this forum, many times I test CA, or myself... because I am learning the boundaries.. Once I learn a boundary, I figure out how to navigate around it. This is why I ask a lot of "best practice" questions. I am also exploring how far I can push the CA schedules and material take off tools.
I never would have even thought to set the newels to zero inches. That is a great tip!
-
-
16 hours ago, Renerabbitt said:
If both users are active then the updated catalog will auto rename and be lost in infinity unless actively checked and renamed back to user_catalog. Important to note that with a multi user setup


Just got to be smarter than what you are working with,... some good advice here!
-
On 9/5/2022 at 3:14 PM, mtldesigns said:
I use the schedule notes all the time, keeps things clean and organized, not to mention one place if I have to change a note. I use them for my floor plan, electrical plan, and elevations. Specifically elevations, I was wondering if there is a way to call up a note number instead of copy and pasting the balloon from another view?
Interesting use case. I switched all my notes over to Rich Text Blocks to take advantage of the touted formatting/editing as in my area there are many CYA notes required for PE sign-off. I tried your method and it looks great, but limited in formatting. What am I missing?
-
Update: It appears to be the column. I selected one out of the library that was similar to the video, and it cleaned up.
-
I have done some "illustrative truss work" and found the copy function to work well only in certain situations. I had good luck manually placing them however. It gets a bit more involved with girder trusses, etc, had to play with the bottom chords, etc. Pretty much not worth the hassle unless you really have a need to look cool on the concept phases. I just overlay the truss company output given its the same scale, that works well.
I hit that error in the KB several times, I just manually draw it in as it is all just show anyway.
-
Hi all, I have a test plan where I am trying out the various ways to make gable/hip entry roof mixtures on porches. I have two questions:
1) I have made gable entries using the gable tool with a single room, as well as multiple rooms via invisible walls, so far both ways are successful overall using come custom ceiling planes. Wondering if there are any far reaching pros/cons of either method?
2) I have also made one version that is single room, and follows a pattern in a video done by@SNestoron X11, so I know it works. I just can not get the Post2Beam roof soffit/wall section to generate correctly. I looked at many settings and videos but I can not put my finger on the fix. I believe there is a setting that controls this (I tried the roof returns also)? I realize his full video has other compoents like attic walls, custom ceiling planes to finish it, but his plan generates the soffits just fine. Not sure what I am missing.

-
@SNestor I use that way all the time... you are the one who taught it to me
 . It works great 9 our of 10 times except in the following conditions....
1) When the wall intersects a window or doorway. I have not been able to get the doorway to not interfere with the window or door. So I cut to Post2Beam railing and remove the end newels.
2) Sometimes, I get bleed through on the 3D, and no matter how hard I try, I can not seem to get it right in all plans, so I again, cut to Post2Beam railing and remove the newels.
3) Sometimes I have gotten some odd generation and roof connections seem to be problematic, and changing to Post2Beam railing seems to solve it. I have a case into support and no answers yet. Support initially came back and said it was related to the doorway meeting the other walls. I quickly disproved that by eliminating the doorways, still the same odd roof/wall connections. I am pushing to get them to tell me what works and what does not.
I have made my own wall type that represents a CMU/stucco "Post2Beam Header" wall with all the right definition for reality, and then put in the doorways if that works out per number 1/2/3 above, and the wall schedule is correct that way also. All peachy.
If not, I change the same wall to Post2Beam Railing (it still shows up as the right wall type as an object), it solves the problems with 1/2/3, but it screws up the wall schedule. Support has accepted it as a bug. I get around it by using my own CMU/stucco "Post2Beam Header" legend that I overlay on the schedule.
Another BIG advantage of the method you taught me, is you can custom place your newels, or posts, as well as control the length of the post. Versus the Post2Beam railing wall method that only allows the spacing.
-
1
-
-
I just had to deliver a plan that had an recessed wet bar in a wall. I searched around and actually found an old post from Rene on using a window in the wall with all the components turned off. Worked slick. Then I tried a doorway, that worked also. The framing reveals a heavier header/lintel on the door method. In this case, there is a cripple wall up to the main top plate, and given this is load bearing wall overall, I used the doorway. I guess the other way is just frame in the recessed niche, make it a nook room type, and just set the ceiling height (like I did for the window and doorway method), probably better in the long run for other objects maybe?
Just wondering if yall had any preference and why if so.
Update: I guess the wall niche tool could be just as appropriate? Nah,,, just checked it, seems it limits the depth to the depth of the wall.
-
42 minutes ago, DBCooper said:
You could use a library symbol for your post that is rectangular. A bit of a pain to get it setup right and would be nice if you could just specify both sizes in the dialog instead.
Yeah, I have employed that technique in the past, putting custom materials on etc.. 98% of the time here in FL, it is just CBU and stucco, so it would be most useful. Thanks.
-
29 minutes ago, DBCooper said:
You just need two materials, one for the beams and one for the posts. Set the angle of the materials how you want them.
Ok, the define material dialog control.... got it. Thanks.
-
Using a post to beam wall, need to set the beam to a siding material like Hardie. All good but I need to change the direction of the siding on the beam from vertical to horizontal. I tried the vertical/horizontal profile setting, etc., but no results. I imaging I might have to use the surface builder stuff, I need to rotate it 45 degrees.

-
I have to use Post to Beam wall many times in my area for porches under truss. That process works well overall.
There is a checkbox to set the newel width to match the wall width which works. That results in a square post/newel. In reality, these newels are constructed of CBU, and hence are not square but are rectangle. Any way to do this? I have not found anything anywhere.
Sometimes I get around this by using a CBU wall type with doorways. That works well, but not when the wall lands on a window or door
 , and sometimes it is hard to get the doorway to land well on the wall.
-
@Kbird1 I submitted the case and they were able to replicate and apparently are taking it into the "bug queue".
-
On 8/9/2022 at 8:59 PM, Kbird1 said:
Yes..... though if you have changed your mind on SSA now? I believe there is a 90day(?) forgiveness policy , it is always going to be cheaper to get SSA , than upgrade to the next version the following yr.
* perhaps try though....as this is not a Support Issue and you aren't asking for help , you are merely reporting a bug.
M.
30 day policy,,,, I plead my case and got back in, only a few days out.
-
I bought the screen room library from snestor, pretty cool stuff for pretty low money.
-
1 hour ago, Alaskan_Son said:
Not sure you quite followed. You can use separate schedules for each unit.
Also, just a side note, but I would suggest you abandon your "contained rooms" train of thought. The concept very quickly comes crashing down when:
- the overall footprint of the unit doesn't actually "contain" one of its rooms
- there is no overriding large room or when there are adjacent rooms of equal size
- when a the largest room is broken up into smaller rooms using room dividers
- when there are rooms inside of rooms inside of rooms
- when the largest room is surrounded by smaller roooms
- etc.
Here's a quick example plan:

I follow on the separate schedules, crisscrossed on my response update before you saw it.
If you say to drop it, I will :-)
The custom schedule was a good idea for other uses though.
-
 1
1
-
1 hour ago, Alaskan_Son said:
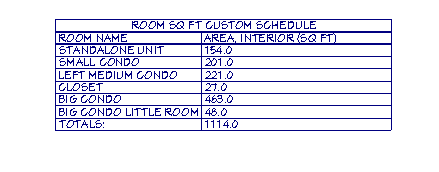
There are several ways, many of which have already been mentioned directly or alluded to. One that hasn't been mentioned though is to simply use a Custom Schedule. Just make sure all rooms in any given unit are set to report to a Schedule using a Custom Schedule Category and then set your schedule to report only that one Category. Make sure your schedules for each unit are set to report a Totals Row and there you have it. In fact, if you set your Schedule to Swap Rows/Columns and then Right justify the schedule text then your total will always remain in the exact same location so that you can simply use a cropped layout box or you could even mask it. This approach can be used to tabulate all sorts of things. The 2 key elements though are:
- Having your objects report to the appropriate Category/Categories
- Having your schedule only report the appropriate Category/Categories
The tip regarding swapping rows/columns and right justifying isn't necessary, but it will help you not have to reposition your schedule after any changes to the plan have been made.
The Alaskan_Son strikes again!
Nice trick, thanks, did not think of that. That will do nicely on the totals for the permitting cover page :-).
I think the OP might have wanted a breakdown by "unit", which in my model would be one unit and contained rooms only in that condo, and a unit could be multi-floor for sure. Got any ideas, its a valid ask. I guess you could make a custom schedule per unit. Can you subtotal and then total in a schedule? I have not seen that.
-
Wondering where I can get a list of any features/bugs that get tweaked on a program update,... release notes. Maybe I missed it?
-
I started at the low version, quickly realized for full blown construction docs and the like, its a no brainer to Premier.
Unless you are doing stuff like kitchen/bath remodels only, then things like Shapes 2020 will have connections to the manufactures for super fast quotes. I learned in that game, its different.
-
Actually there is the Room Finish Schedule that is ever closer. Too bad it does not seem to roll-up like room sq-ft in contained rooms within the room you select like a sub-report., as It does appear to for walls in the wall schedule. As Eric points out in the video, rollup calculations do seem like a basic thing that would be most beneficial. I assume the schedules are doing a very similar thing with macros under the covers to extract the object information into the schedule.
The polyline is slick, and probably more flexible. However I am seeing other problems with it. I made a custom schedule for the polylines, only the labels for normal polylines show up, the Make living area tool polylines are not, making the schedule difficult to use (note labels in schedule below). The speed of the tool is cool for doing other things maybe. But for the purposes of marketing, material rollups per unit, I an not see any difference from the Room Finish Schedule. Perhaps I am missing something in the edit tooling polyline labeling. Plan is attached with these polylines.
Regardless, both methods can get quite tedious at scale. ACSDucers is another way to handle the scale if things stay the same. I think the real answer is a robust Ruby/macro scrip that crawls the plan and does what you want. Apparently several members produce them.


Truss experts
in General Q & A
Posted
@Hammer7
I just watched a series of videos by Scott on Truss Framing. I would suggest watching the series. There is a lot more truss capability in CA than at least I thought. I just never dove in due to the way I work with the truss companies. As the video claims, it is not an engineered product, but on complex jobs may be valuable to the build crews to visualize the end game, and info to the truss designer as to the need. But I have to admit, it is powerful. The series also answers a lot of questions I have seen on this forum on my time here on how to do stuff.
@ShaneK smokin' hot stuff.