

Hoff_Design
-
Posts
257 -
Joined
-
Last visited
Content Type
Profiles
Forums
Gallery
Everything posted by Hoff_Design
-
 Sometimes when creating a plan set, I just draw a cad line in the floorplan view and block the space for hanging and shelf space and in the estimate calculate for simple rod and shelf and then if the client wants to upgrade to fancier closet, then with their approval focus in on creating more detailed drawings/renders of the space. I find the built in cabinet tools do a great job with a combination of the shelf, and for the rods (depending on their shape) I draw the profile then make 3D solid for rods. Its mostly driven by what the client is looking for. In other projects we build the space and have a closet organizer company come in and meet with the clients, and they provide detailed drawings of their products.
 -
Did we get the down vote from the Mac or the PC?
-
When will X17 be released to the general public..?
Hoff_Design replied to mtldesigns's topic in General Q & A
Thank you brother, I enjoyed the challenges. -
I have a variety of machines and have found that the windows PC has been very good for Architecture and 3D graphics and most studio and video work... but when I am doing an event requiring media and audio, the mac has never failed me. So I am obviously not much help. I feel your pain.
-
When will X17 be released to the general public..?
Hoff_Design replied to mtldesigns's topic in General Q & A
The beta is available, perhaps download that and play around with it but keep X16 as your main program till you get comfortable with X17. -
 X17 render of old book(s). Same book...copied. Made this as a prop for the library. Client got back with me, they love the library space and the 3D representations of their fossils. So it will get built. Impressed with X17 rendering, ray trace.
 -
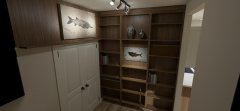
Designing a library in a small space that features the prehistoric fish you see in the images. I could not find track lighting that enabled me to position the track lights the way I wanted so I finally chose to use the 3D solids and make one. The slabs with the fish are to scale
-
-
From the album: Library In A Small Space
-
 I wanted to make a realistic "old" book for the library...I made one in Chief X17 that was decent, but I wanted to try making one in Sketch-up, then apply colors to each area so I could apply the textures that I made for it earlier. So I made this model in Sketch up then imported into chief, then added the textures and rendered in X17. Super happy with the realism. I wanted old, so I selected an old one off my library shelf, but did not realize how old it actually is...this one was printed in 1818. That's back a bit! I took pictures of it with my phone from all angles, modified them in photoshop, then brought into Materialize to create normal, ambient occlusion and diffuse maps, then brought those into X17 and set them to stretch to fit. I followed a youtube tutorial to make the book, here is the link. https://www.youtube.com/watch?v=xfkjL2L7scU
 -
From the album: Library In A Small Space
-
I got off on a rabbit trail! I am genuinely impressed with your X17 workspace with the placement of all of the icons.
-
I can't help but marvel at your "iconic" workspace! Its like viewing a majestic art piece...
-
 Nice textures.
 -
 Needed to make a book... I used Chief X17 solids, but had to separate the back, front and sides so I could apply the texture to each surface
 -
 Rendered this one using the "tone mapping" selection of ACES. Much darker shadows.
 -
From the album: Library In A Small Space
-
From the album: Library In A Small Space
-
From the album: Library In A Small Space
-

From the album: Library In A Small Space
-

From the album: Library In A Small Space
-
...or go to camera specifications and change setting from automatic to "light set". The default Light Set will turn on all lights.... or you can create your own light sets and force them to be on.
-
 Used the remove exterior camera facing walls to capture this render.
 -
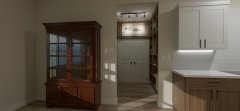 I modeled the cabinet to the left with the built in cabinet tools in X17. It matches the one they have in that location. It would be great to have a stain slider to control the amount of blended color we add to a texture...maybe there is a way? The only way I know at the moment is to take the texture into photoshop and reimport.
 -
 Pretty tight space to get a good render.
 -
 On the track light, I used a sphere and a couple of of cylinders. The part that is lit is set with the lighting white and is adding area light to the room (set at 2500) each. Then I added a directional spot light for each of the track lights which is lighting up the fossils. It worked. With the track lights I can point each of the lights where ever I want them using plan and elevation views.(Still have to adjust the lighting data in the lighting dialogue box though to adjust the angle of the spot lights)


