Renerabbitt
-
Posts
5248 -
Joined
-
Last visited
Content Type
Profiles
Forums
Gallery
Posts posted by Renerabbitt
-
-
2 hours ago, CBarchndesign said:
I need help to interior elevations for a construction set.
Happy to help

renerabbitt@gmail.com -
On 6/8/2026 at 6:36 PM, para-CAD said:
Now lets see some smarter input from you experts. This could be fun.
Funny I built a website of the chief manual back 2.5 years ago for the same reason. I forgot I have it still embedded in my website in offline pages.
Ive spent years now training all of my ai so its pretty dang good. Personally I love cursor because of its abilities for using any and all resources on my computer and the web including api access.
Probably a unique case for me though, i dont need it for chief architect questions, i need it for scripting ruby for chief and keeping track of my systems. I feel like youll get to the right answer faster just by posting your questions here, haha -
31 minutes ago, cjanderson66 said:
Rene, How in the world did you get it to automatically resize and abbreviate. If you look at my screenshot, my Laundry / Mud room label is to long to fit in the room. I have checked and unchecked all the boxes in the Appearance section and it still does not let me resize the text.
see video
-
 1
1
-
-
38 minutes ago, cjanderson66 said:
What was the point of this change and is there a way to modify the room label?
SO many many many things are better with the new room labels. its just a learning curve. like molly said just get into the label settings.
My room labels now automatically resize and abbreviate and auto plaec themselves in the room and its frickin awesome -

I got Chief backups from 50 minutes down to 12 minutes. Chief devs, please don’t kill me.
First off, let me say this: Chief Architect devs, please don’t kill me. I’m sorry. This never would have happened if we had a simple tool to export toolbars.
With no toolbar export, the only real path I had was to create a backup. But my backups were taking forever, so naturally that sent me down a ridiculous rabbit hole.
The good news is that I went from backups taking around 50 minutes to backups now taking around 12 minutes.
That is the fun hook. Now here is the chaotic process that got me there.
After doing a bunch of monitoring, scripting, and testing, I discovered that when Chief boots up it creates a bunch of temporary directories inside the Windows temp folder. In managed mode, Chief is storing/encrypting managed resources. When you run a backup, Chief appears to decrypt/unpack those files into those temp directories. Once those are written to temp, Chief starts compiling the correct backup folder structure, caching/indexing that information, and then finally writing the backup zip.
At times, some managed resources also appear to pull textures from their original source locations on the hard drive. I have not fully figured out why or how to avoid that, but I know it is part of the process in my system. Because of that, I added an optional texture-folder redirect step as well, and that shaved another couple of minutes off my backup time.
For context, my original backup was around 24 to 25 GB.
A big part of my file bloat came from how my template/project system is built. I use an extra plan file where I store spec writing and Project Information headings so that I can quickly swap jurisdiction/reference information. That file had a bunch of materials in it that I did not actually need. So the first optimization was consolidating and reducing unnecessary materials in that warehouse/reference plan.
The next thing I started doing was exporting projects when I was done working on them, then reimporting them when needed instead of keeping everything active and bloated all the time.
The big asset step was building batch scripts to export textures from the Asset Manager. Then I used another script to identify secondary texture maps versus primary texture maps. By secondary maps, I mean things like opacity maps, bump maps, normal maps, AO maps, roughness maps, etc. My textures use a lot of these extra maps because I care about realism, but I also have thousands of textures in my libraries, so this adds up fast.
Back in X17, I batch-resized a lot of those secondary textures and then had to automate replacing them in Asset Manager. That was another whole script. Then in X18, since Chief allows WebP files, I did another full pass and converted a ton of PNGs to WebP.
All in, I reduced my backup from about 25 GB down to about 12 GB.
That alone was a huge improvement, but even at 12 GB, backups were still taking 30 to 45 minutes.
Then came the next round of craziness.
Once I understood more of the backup process, I built a set of PowerShell scripts that temporarily redirect three things to a RAM disk:
-
Chief’s managed resources folder
-
Chief’s temp directories
-
My external textures folder
Then I also write the backup output itself to the RAM disk.
The reason this matters is that Chief’s backup process is not just writing one big file. It is touching thousands and thousands of individual files. It is reading them, validating them, decrypting/unpacking them, indexing/caching them, restructuring them, and then writing them again. Sequential write speed alone is not the whole story here. A lot of this comes down to small-file read/write behavior, latency, and single-thread processing.
This is also why I started paying closer attention after being on calls with people running Apple Silicon Macs and seeing how much faster some of their systems were in certain Chief operations. I originally thought I just needed a drive with a higher sequential write speed, but this kind of workload is much more about small-file performance, latency, and how quickly the system can chew through tons of tiny file operations.
So, for my test, everything possible gets temporarily shoved into RAM:
-
Managed resources: RAM disk
-
Temp backup folders: RAM disk
-
Textures: RAM disk
-
Backup output: RAM disk
If I skip the texture redirect, I only need a RAM disk roughly three times the size of the backup. If I include textures, I need closer to four times the backup size. In my case, I have 128 GB of RAM, so creating a 60 GB RAM disk is not a big deal.
With all of that in place, my 12 GB backup is now taking about 12 minutes, so roughly one minute per gigabyte.
To be clear, I am not recommending that anyone casually do this. This is mostly just information for people who find this kind of thing interesting.
The bigger takeaway is what this taught me about building a very fast Windows machine for Chief.
If I were building a Chief-focused Windows workstation today, the things I would care about most are:
-
Strong single-thread CPU performance
-
A good amount of RAM, ideally 64 GB or more if you do large projects or multitask heavily
-
An Nvidia GPU that supports current RTX/DLSS features
-
Very fast NVMe storage, with a focus on latency and small-file behavior, not just peak sequential numbers
-
Potentially RAID 0 for NVMe drives if you are comfortable with the risk and have a good backup strategy
For GPU, Nvidia’s current public DLSS branding is DLSS 4, not DLSS 4.5, and it is tied heavily to RTX 50-series features like Multi Frame Generation. (NVIDIA)
For storage, the newer PCIe 5 drives are getting pretty wild. Samsung’s 9100 PRO is listed up to 14,800 MB/s sequential read, and WD’s SN8100 is listed up to 14,900 MB/s sequential read. (Samsung) But again, for this kind of Chief backup workload, the headline sequential number is not the whole story.
I mistakenly thought pure sequential speed was going to get me closer to the performance I was seeing elsewhere, but the real issue is all the individual little file operations. That is why I am also moving toward a RAID 0 NVMe setup. The idea is to split the workload across drives and take better advantage of the individual NVMe controllers/caches when Chief is hammering thousands of tiny reads and writes.
One note on RAID 0: it is seen as one drive. So if you need 4 TB of usable storage, you use two 2 TB drives. Do not do what I did and buy one 4 TB drive, then realize you need a second 4 TB drive and accidentally build yourself an 8 TB monster you may not actually need.
If upgrading an existing system, my current thought process would be:
Move large files to an external drive or cloud storage, set cloud folders to online-only where possible, shrink the active system footprint, create a backup image, build the RAID, restore the image, then bring cloud/external files back as needed.
For RAM, I think 32 GB is okay, 64 GB is great, and 128 GB is useful if you are doing ridiculous stuff like this while also running Photoshop, Chrome with a pile of tabs, OBS, AI camera software, ChatGPT, Blender, Substance Painter, etc.
For CPU, single-core speed matters a lot in Chief. I am personally sticking with my current CPU for now because I run a ton of programs concurrently and I benefit from the larger core count and cache, but if all you mostly do is Chief, Chrome, and email, then single-thread speed should be a major priority.
Anyway, hopefully this is at least an interesting write-up. I do not recommend going full mad scientist unless you like breaking things and testing them. But I do think the broader lesson is useful:
Chief backup speed is not just about “fast storage.” It is about how Chief processes thousands of managed resources, textures, temp files, and small file operations.
Feel free to ask questions.
-
-
Voice-to-text ai formatted unchecked(There may be errors)
For me, the best new features in Chief Architect X18 are:1. Speed. Speed for everything.
This is probably my favorite improvement overall. Project Management feels significantly faster across the board. Creating new projects, deleting projects, deleting individual files, and even booting up Chief Architect in Project Management mode all feel much quicker.
I can’t fully confirm this yet, but plan draw speed also seems faster to me. On the whole, X18 just feels faster and more stable.
Rendered views also seem more stable in DLSS mode. For any kind of ray-traced/rendered view, DLSS now feels faster and more usable than it has in the past. In some cases, the ray trace with DLSS enabled feels faster and more stable than a standard rendering technique, which is a pretty big deal for day-to-day workflow.
On top of that, I’ve been doing a bunch of system testing and have found that if you want the greatest amount of speed in Chief Architect, a RAID configuration for your hard drives may actually be a worthwhile expense. Chief appears to rely on thousands of individual file reads/writes rather than just large sequential writes, so a RAID setup can make a noticeable difference for the fastest possible system configuration Since it is always indexing or cachine many different img files for your materials
2. Layer-based fill styles.
This one is huge. The options are basically endless when you can control fills on an object-by-object or layer-by-layer basis.
My favorite implementation so far is a working framing view where different framing member types are clearly distinguished by their fill styles. That alone makes framing views much easier to read.
I’ve also set up a bunch of custom layers for wall type display control, including separate control for air gaps, framing layers, exterior layers, and interior layers. This allows me to drive an entire wall display system across saved plan views, making wall assemblies much easier to read, customize, and manage.
3. More object types in Style Palettes and the library.
The additional object types that can now be included in Style Palettes, or saved to the library, are another big workflow improvement.
Things like distribution paths and cladding profiles being savable to the library open up a lot of potential for faster, more consistent workflows.
4. Room labels.
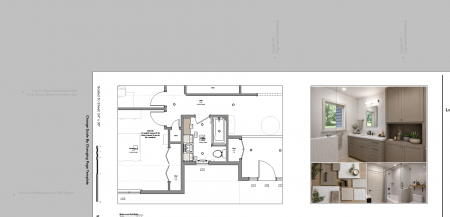
Room labels are definitely one of my favorite additions. I’m using a custom font to create rich-text-style room labels, and I’ve built a three-tier system that abbreviates room names and ceiling height labels based on the size of the room.
The result is that I almost never need to relocate a room label because it doesn’t fit inside the room or because it conflicts with dimensions, text, or other annotations. That is a huge quality-of-life improvement.
5. Project Information System.
I’m using the Project Information System to drive annotation preferences and automatic annotation systems.
For example, I can now automatically annotate wall elevations just by dropping in notes or text annotations that are driven from project information. I really like how this reduces user error and lowers the potential liability that comes from having the same information entered in multiple places.
Having one addressable location for project-based annotation data is a very strong addition.
6. Nudge Further in layout.
The new Nudge Further function is really useful in layout. I’ve actually inverted the way I use it. I set my snaps to 1" and my grid to 1/8", so I can Shift+nudge by 1/8", while still snapping or bumping layout boxes by 1" increments.
That setup has been really nice and saves a lot of time.
7. WebP image support.
This is a bigger deal than it might sound like. I was able to reduce my overall backups by about 5 GB just from WebP support.
For people with large libraries, like myself, that is a huge improvement. It saves storage, speeds up backups, and generally makes managing large assets easier.
8. Editing materials created with Material Builder.
Being able to edit materials created with the Material Builder is another great improvement, especially when working with additional SBAR files. This makes material workflows a lot more flexible and useful.
9. Managed Mode units.
Managed Mode units are something a lot of us have been asking for. I still want a few improvements to that tool, but I’m very happy to see this addition.
10. Retain auto framing by converting to manual framing.
Being able to retain auto framing by converting it to manual framed members is a really cool addition. I think this could make a big difference for pole barn construction and other workflows where you want Chief to generate the framing but still need manual control afterward.
11. Default room fill.
Setting up default room fills is also a great addition. I can see this being especially useful for real estate-style plans, stock plan listings, presentation plans, and other graphic plan workflows.
12. Library thumbnails.
I really appreciate that Chief is generating thumbnails for library items. Anything that makes browsing large libraries faster is a win.
13. Restricting schedules to specific floor levels.
This is a huge addition for anyone doing automatic area analysis or floor-specific schedules. Being able to restrict schedules to particular floor levels opens up much cleaner automatic reporting workflows.
Overall, X18 feels like a very strong release to me. Some of the changes are flashy, but a lot of my favorite improvements are the ones that remove friction from everyday work: speed, better display control, better annotation systems, better library workflows, and fewer opportunities for user error.
-
1
-
-
On 7/4/2026 at 3:49 PM, robdyck said:
when I use Save As Template
I never use this feature for my template creation. it affects to many things that I want to remain unaffected. this means I have to be VERY careful about not drawing any rooms. I've never truly understood when or why chief architect rememebers rooms but i find it easiest to just make sure i dont draw one.
I then do a practice plan to dial in my layout and links etc, and any changes i make i then either have to import or duplicate into the blank layout and plan. -
32 minutes ago, PitMan71 said:
I thought this too. LOL.
yall forget that I consider Mark the cabinet master..not the other way around
") Man is a wealth of knowledge
Man is a wealth of knowledge
-
1
-
-
9 hours ago, clearvuedesign said:
I'm pretty old so I'm really used to the old school in a lot of ways. There is one thing: I just looked and you're doing the X18, but something changed between X16 and X17 to X18. Now my icons in my toolbars lose all the information. Some of them will actually fill with the icon, but when you press it, it's empty and it wants me to re-link. It has something to do with them changing something in their coding, and I'm interested if you can give me an update on how much it would cost me.
This conv better in chat most likely but I give 40% off to all previous purchasers. There are update codes in the accounts tab when you login. There's also a bout a billion hours of development since you last purchased, ha...probably some things you might really like.
-
2 minutes ago, clearvuedesign said:
ClearVue, not in the template,
very cool. this is the system in X18 thats more for spec but can handle any information output to a csv:
-
6 hours ago, robdyck said:
be even more robust.
I built this for my X17 templates. it read right from CSV automatically and while in project management mode.
I personally loved it, but again was too complicated for scalability.
Not only does a system have to be hands off and intuitive but it also has to handle modification and unique parameters if I were to distribute. All in all, even though it was only a few steps to setup, I had user after user wanting to setup unique parameters and naming conventions that would break the system.
It was very cool though for my own personal workflow to just tell my ai agent to go look up my last meeting and update my designer/client info based on that into a csv and then open chief up and see it all there. -
4 hours ago, Joe_Carrick said:
but it saves me thousands of hours.
Your system is not all that different from mine conceptually. You and I just have very different needs.
Keep in mind that I distribute my templates, and they need to be workable for beginner to intermediate Chief technicians. Because of that, above everything else, the system has to be user-friendly with very little need for additional process documentation. It also cannot be overly specific to our California code requirements, which would be 10x overkill for most of the rest of the world.
It also has to be intuitive from the perspective of someone completely new. Like you mentioned, it took you a long time to build your system. It also took me a long time to discover what is actually intuitive to an end user versus what I personally perceived to be intuitive.
Designer, client, and project information all come from a Project Information plan. This allows someone to easily swap out that file with other versions they have built by copying it, which can be used for things like changing the title block, logo, design load criteria, specifications, and so on.
This is not just California-specific. The system does have automatic lookup for a few criteria across several states. Previously, I had automatic spec switching based on project city, state, zip code, or country for NBC Canada. But again, even that became a bit too complex for the end user.
Now, with X18, the end user simply types the code criteria they want, such as “2025 IRC,” into Project Information, and the spec switches through a macro. So at the base level, all the end user has to do is swap out their logo, fill out their designer information, and enter the code criteria fields. Simple user input. The macros handle the rest.
I strongly dislike gathering data from polylines. I find them to be the least intuitive for end users, and they carry the most liability because the user has to manually update them whenever the building model changes. Because of that, my area analysis comes from a room schedule with some macro magic that allows for adjustments. In other words, site analysis is coming from the building model itself. Thats the bulk of what I have on my G1 page or G001 for you maybe
I have three template pages: two scaled pages, one at 1/4" and one at 1/2", and one no-scale template page. Switching the template changes the scale annotation and adds a graphical scale.
That is all I am including in a base-level plan intended for distribution.
-
7 hours ago, Joe_Carrick said:
The polyline dbx really needs to have a label box with at least 10 lines of space to prevent the need for so much scrolling.
YES YES YES YES YES and more YES
7 hours ago, Joe_Carrick said:That way it's executed as soon as the Layout is opened.
Mine also executes as soon as layout is opened, without ever opening the plan file
because the polyline is alongside of those information blocks and they are sent to layout
-
11 hours ago, Joe_Carrick said:
Do you have Michael's hack for this? I put mine in a the Label of a Polyline on sheet 0 of my layout.
yeah he posted it here on chieftalk somewhere a long time ago. I have a bunch of pages of notes in onedrive from things all of the macro guys have said over the years.
I use it in a plan file. the plan file is setup for all title block info and spec writing on your general sheet so its easy to swap out when i change jurisdictions or who I am drafting for etc.
all of this gets sent to different parts of layout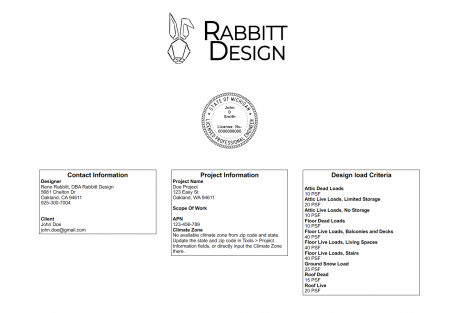
and this polyline has all of the captures -
19 hours ago, Joe_Carrick said:
I'm not sure however that I would need to insert macros into field values.
I was on a training call yesterday and, as I often do, I started by giving you big compliments. But I also mentioned that no one could simply pick up one of your layouts or plans and immediately understand how everything works. The workflow is incredibly specific, with a lot of knowledge required to perform even simple tasks, plus all the unique layers and layer sets involved. You and I wouldnt need this but its nice for end-use
All that to say, leaving a macro call inside a value is a smart way for the template to automate a task while still giving the end user one easy place to override that automation when needed.
In other words, its great for scalability without the need for unique training.
19 hours ago, Joe_Carrick said:For the most part it's pretty easy to duplicate classes and copy field values. To be honest, I am so happy to get this as provided that I basically overlooked the slight annoyances you outlined above.
I always hear Kevin Transue screaming from the rooftops "inheritanceeeeeee"
Why this dbx was designed in a way that didnt just inherit properties from other similar dbx is what he would be referring to. Why isnt there a "user input dbx standard" module thats just plug and play so that it behaves similarly to the project browser/library browser or the "add lights" dbx?
19 hours ago, Joe_Carrick said:Currently I have use a bit of ledgerdemain to get editable values.
as in a displayed polyline or other object with a label that says %$chief_project_zipcode="%project.zip/postal_code%";""% yeah...same wish +1000
-
-
17 hours ago, mkennedy2000 said:
painless way to maintain a versioned folder structure
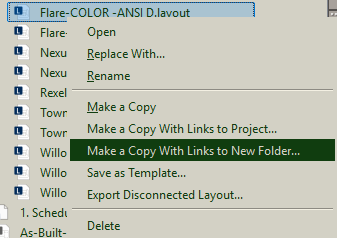
this copies your layout with all of its established linked plan files into a new folder within your existing project. This will be a completely separate layout with linked plan files that will have no links to the originals-
1
-
-
-
Fairly easy solution:
-
 3
3
-
-
On 6/19/2026 at 1:39 PM, DefinedDesign said:
Thanks DB, question when it converts to an architectural block will it still populate in the materials lists for the cabinet schedule and countertop quantities?
Turn off automatic fillers, and select your cabinet and add an extended stile
-
On 6/17/2026 at 2:24 PM, BryceEngstrom said:
Any plans to accept LIDAR other than iPhones? It's kind of ironic that that it seemed like it took a long time for Chief to even offer a Mac OS version, and now this is the only Lidar file you will support?
Not really a Chief-specific issue on either of those fronts, at least not from a software development standpoint.
On the rendering side, Chief’s path tracer and other GPU-dependent features rely heavily on the graphics API and driver support available from the operating system and hardware vendor. On Windows, that generally means working through DirectX / GPU driver support from NVIDIA, AMD, and Intel. On macOS, that means working through Apple’s Metal API. If Apple’s Metal implementation or developer support is lacking(WHICH IT WAS), delayed, or not responsive to support tickets, there is only so much Chief can do from their end. They can optimize within the tools Apple provides, but they cannot rewrite Apple’s graphics stack or force Apple to prioritize bugs that affect a relatively small professional CAD/rendering market.
Same general idea with LiDAR. Apple has a very mature and well-documented development ecosystem around their LiDAR hardware, including ARKit, RoomPlan, depth APIs, and device-level support. Developers building scan-based workflows have a relatively clear path on iPhones and iPads because Apple controls the hardware, operating system, camera stack, sensor calibration, and API access.
Competing platforms are much more fragmented. Even if another phone technically has depth sensing, LiDAR, time-of-flight, or some other spatial scanning capability, the development tools may not be as standardized, consistent, or commercially viable. Android devices vary widely by manufacturer, sensor package, camera pipeline, OS version, and API support. That makes it much harder for a company like Chief to build and maintain a reliable scan-to-plan workflow across a broad range of non-Apple devices.
I wouldnt point the finger at Chief is all
-
1
-
-
3 hours ago, Gawdzira said:
So far, you can not utilize point cloud data in Chief. The best option at this time is to have the floor plan derived from the Lidar data (I am doing this with Matterport scans, non Lidar) and then you are going to trace the pdf walls.
you can, its just imported as a fixture. It's very easy to align the walls by nudging them until they are in plane with the obj file.
You just need a matterpak -
1 hour ago, SteveCanbury said:
If only I had that option in HDP 2025 .....
FYI there is a forum dedicated to Home Designer, most of the users here won't be aware of the limitations of the home designer line
https://hometalk.chiefarchitect.com/ -
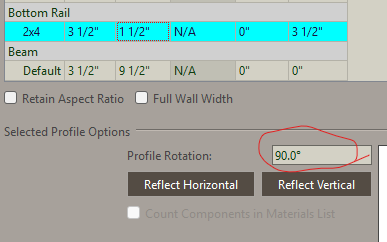
1 hour ago, SteveCanbury said:
DW3 and DW4 in the screenshot below
rotate the 2x4 instead of changing the width and height
-
1
-


Easier Centering on Layout Pages
in Tips & Techniques
Posted
I do something simlar: