

Doug_N
-
Posts
1756 -
Joined
-
Last visited
Content Type
Profiles
Forums
Gallery
Posts posted by Doug_N
-
-
Sounds like you should contact support right away!
-
 1
1
-
-
10 hours ago, SHCanada2 said:
@Doug_N Did you try polycam?
No, I didn't
-
I have just purchased an iMapper system. I currently use a Matterport Pro 2 camera, but lately the floor plans being issued are way out of whack.
The iMapper is a lidar system that is accurate to 2mm over 30m. I will let you all know how this works out my asbuilt work.
-
That can be done, but it has the disadvantage of using the defaults of the plan file that one is pasting to. So if rooms from the copied plan has different floor heights, the and the pasted building is using default room heights, then the pasted building inherits the native heights.
-
so far as merging two plan files, I don't think so, but you can have two plan files merged using reference layers in a layout file.
-
Please post the plan file. Export an unconnected plan file if you are using managed projects. Make sure to close the file prior to trying to post it if you are using unmanaged projects.
-
Hi Rene,
I think most of us ignored the comment about what you do, as a user of your proplan, I knew that the comment was incorrect, but that was not so germain to what is the standard.
Keep up the great work that you do and so many colleagues in this forum apprectiate the contributions that you do.
-
1
-
-
Depending on the size of the drawing sheet, having the title boxes on the right side of the drawing running vertically allows the most drawing area. It seems to be an informal norm for most architectural, structural, mechanical, and electrical drawings. Just my experience anyway.
-
Thanks for the comments. This is an as built drawing, so the brick ledge is required in the sections that will have to be included in the renovations for damp proofing the basement as well as the details of the furred basement walls and insulation. One problem that I have to solve with this project is a wet basement.
The wall can be fixed by manually adjustments, but it just seems strange that it happens at all.
-
On 7/3/2024 at 12:39 PM, Billis said:
Hey! I used Matterport for a project last year, and it worked great for capturing entire houses. It also integrates with Chief Architect, which made the process smoother for me.
How does it integrate with Chief Architect? I am very interested and currently use Matterport Pro 2 camera.
-
-
-
-
Put the plan file in a dropbox, or on Onedrive, and post a link to the file.
-
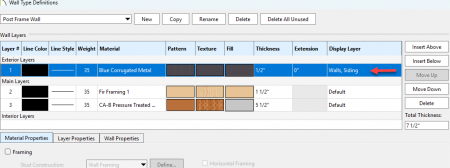
Next question, have you created a copy of the wall type being used in the plan? Hopefully, it is the copy that you are trying to modify.
Also, it would be helpful for you to post a copy of the plan file.
-
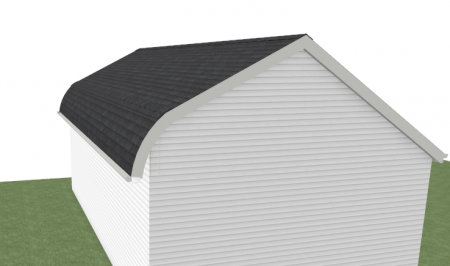
This was just playing with making an upper an lower segment roof with different pitches for each segment, a really steep slope on the lower roof, and then curving the lower section.
Seemed to work.
-
On 1/22/2026 at 5:16 PM, JKEdmo said:
Thanks Doug. Good alternative.
Now that I think of it, not sure I fully understand why opaque glazing option should not be universal even for interior rooms. I wonder what the logic is?
I think you make an excellent point Jim. Perhaps you should make this case in the suggestions part of the forum.
-
Not a great solution, but you could also just change the material type for the glass in this window as opaque
-
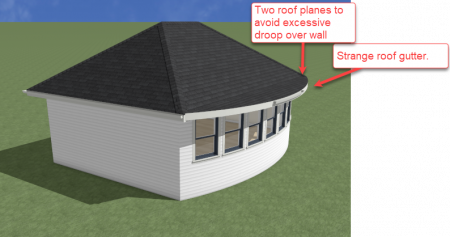
Rene was right, it matters what to order of selection is. In this view, two roof planes were created to reduce the slope of the roof in the curved roof area so that the lowest edge of the roof was not too low.
Being able to curve the roof base is not subject to the curve tool.
-
I tried to duplicate what you did Rene, and it does work for the plan view, but when you look at a camera view, nothing has changed, the roof still has a straight edge. Did I miss something?
-
 1
1
-
-
Please post the plan.
-
12 hours ago, gelbuilding said:
Thanks Doug,
Any luck to see measurements? How to change to mm instead of 1.500mm i need 1500mm for example
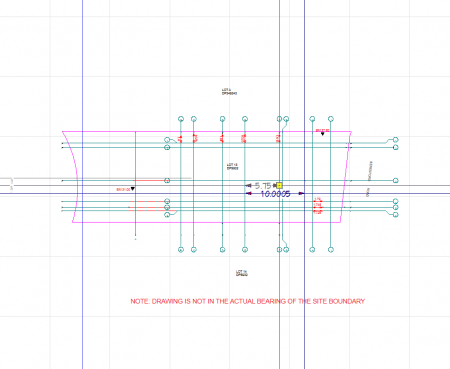
Scale by 1000
-
-
If this is what you are looking for then you can do this in a back clipped elevation, but in the wall definition set the siding on a different layer
Then use a framing layer set in the view resulting in this

The foundation walls had to be turned on as well.


Technology for As-Builts
in Industry & Design Resources
Posted
Hi Perry,
I am on the waiting list for this as well.