

MarkMc
-
Posts
4316 -
Joined
Content Type
Profiles
Forums
Gallery
Posts posted by MarkMc
-
-
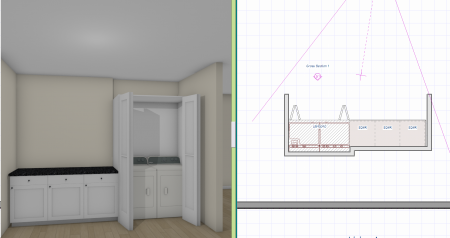
Room divider, place bifold doors (custom door symbol needed?). Cabinet has no bottom, no bottom separation, no toe kick - front is opening with no shelves.
I moved the appliances away using transform replicate XXX" before setting cabinet or doors. Adjust the doors in elevation, move appliances back XXX"
-
Plan attached showing steps. You will need to fill in the toe kick at the wall with a solid (there are other more complicated ways but not for now :)
-
 1
1
-
-
Do with cabinets.
-
 2
2
-
-
2 hours ago, GeneDavis said:
remove that little stile stub you see in the near bottom corner.
First method shown along with two cabinets with nubs removed. One with full height side.

-
I'm not near computer to check but I believe that if in the DBX select the bottom separation and change the reveal to minus(-) the # you want it to hang down by. Say -1"
-
I set a key on my trackball to be the Apostrophe and use a separate number pad with my left hand.
Type number, hit key for feet, type inches. I use an Elecom Ex-G but there have to be plenty of mice out there that can do this.
-
1
-
-
-
1
-
1
-
-
Where about on the Island? Do you need field measures? About how often?
-
1 hour ago, Renerabbitt said:
Also this guy
I not only too kind but also a master. Should we audition for a Chip & Dale remake now
")
-
1
-
-
1 hour ago, mwilliams922 said:
provide drawings that are detailed when it comes to cabinetry
I'd be interested in discussing this with you. 20 yrs KD and dealer- semi and full custom, lots of brands. Freelance drafter for 8 of those, large percentage of clients have been ID's and Cabinet folks. Currently semi retired so not interested in hi volume. Currently only working with one client temporarily. PM me if you want to contact info to see samples and go over things by Zoom.
-
1
-
-
2 hours ago, DVIJD2 said:
I am trying to build the Range Hood
As DB suggests build it from solids

-
Use Plan views


-
1
-
-
It's worth noting that Code, Comment, Description, Manufacturer, and Supplier can be copied by themselves using a style palette. While the custom object fields will always ALL be copied. Hence something your nomenclature is best placed in a custom field, that field is then referenced in the default label. This would leave the above fields available for special purposes (which will eventually occur).
-
Many of the Leica Disto lasers have an app available that will do what you want. I've used the E7500i for a long time though retired now. (made a half hearted attempt to sell it for a while ). I believe that has been discontinued but newer versions likely work. The differences between the versions have to do with advanced features that allow measuring difficult situations.
It can be a bit tricky at first, also was a little annoying changing to new versions which I found unnecessary. I just kept it assigned to X9 which simplified life.
I've used it to input directly drawing all new, to input directly to adjust rough drawing, and to record and input manually. Al the fella that taught me eventually switched to shooting the room then input manually. I never decided which I liked better, both have pros and cons. I'd also occasionally had an assistant measure and call out dims to me. This worked really well once a room was done to add electric etc. (though the memory function works just as well as an assistant.)
Note that I had clients that tried Canvas and in most cases that was not really accurate great, some were a total disaster-YMMV and that was some time ago. I eventually refused to work with anything supplied by them.
-
10 hours ago, allencab said:
create the boxes and front frame configurations
Retired KD here. You're on the right track but not quite. Here's how I approached it.
Assign hotkeys to all of the cabinets in the "Build" Menu

Not a bad idea to place appliances first even just as place holders.
Place you cabinets using the shortcut keys, resize the widths in plan view as you go to what you think they should end up being. (Note that you can resize a cabinet and then just click to add a new one of the same type as the tool remains active)
I usually do bases and talls leaving walls for later.
I used to keep libraries and used the "replace from library" tool to change the cabinet configuration and that still has it's place but nowadays you want to use Style Palettes.
To do that start a "warehouse plan" where you will keep the cabinets you need to make. You don't need to make them all at once. Better to do as you go and learn more about what you need to get from them to place orders. I end up with about 30 cabinets though a functioning set can be half that. (note no need to make both a left and a right in most cases you can just flip the cabinet)

When creating the SP- first "Clear All", then select Copy Face Configuration, Component Code, Comment, and Custom Fields. DO NOT include any sizing or anything that can be handled by defaults. Those extra fields you will end up using for ordering information- modifications and such as text.

You will still end up configuring some cabinets as you go- this or that appliance combo, some other odd request. I keep a library for each job by name. I save any customized cabinets there since it's easier for me to remember them by the job and less clutter in the warehouse. If one is need on a job the the replace from library tool can be handy or of course you can drag and drop that from the library.

-
-
I just saw you are on X14. I did this in X16. Sorry about that but not doing it over. So here is the how.
Start by making a molding
 Place a molding line using that.
Transform replicate, copy that line- I did 12, think 11 is better Space at 19/11.
Convert that to cabinet door, set y origin to 1/2"
Place in a wall cabinet as side panel inset. Set separations to suit. Back and each side match front.
Then using only 6 molding lines make a cabinet door symbol. Another wall cabinet this time 3/4" thick. Place the new door and adjust separations. Convert that to a fixture. Rotate so that it will lay parallel to the floor. Pen it up and set height plane to allow it to grow.
Set first wall cabinet on the floor. Center the fixture over the cabinet in both directions and adjust height.


-
Attached how to with symbol and parts in case you want to change any dimensions.

-
1
-
2
-
-
56 minutes ago, westvale said:
I can't seem to curve both the front and sides,
This was done with solids and boolean operations. I use transform replicate to duplicate and move in case I need to redo later.
Draw, side profile and set depth.

Go to front elevation and draw a new solid that has the curve you want. Look at plan, change depth and position to overlap.
Copy that and reflect about the original.

Use subtract to get the curves on the side.
Then if you need it hollow. Transform replicate, resize some percentage (.98?) Go back to front elevation and manuall pull the bottom of the smaller piece down, the top up. Subtract.
Then add flat solids to in front elevation to fill in the space on the side, copy and reflect, then use union

Here is final with Chloe hood next to it.

-
1
-
-
On 5/5/2025 at 6:25 PM, SusanC said:
Depends on what the client needs for storage
Quite so. I only ever used the two largest Lemans (for susans I always used the Suzi Q never standard bi-fold doors)
It's also quite true that the net storage of corners can be greater when just killing the corner as Rene notes. However but almost never used a 3Drawer base narrower than 30" or more. Narrower I always made a 4 drawer base learned that from taking photos of existing kitchens.
Many years ago I took to photographing every cabinet with what is stored there in a prospective clients kitchen. Measured the big, and odd. Likely 15,000 + photos over the years. Then used that to determine storage needs and placement. I also learned a bit about what did not work and how folks tried overcome the short comings (like narrow 3DBs). Have at least 15,000 photos from then.
-
1
-
-
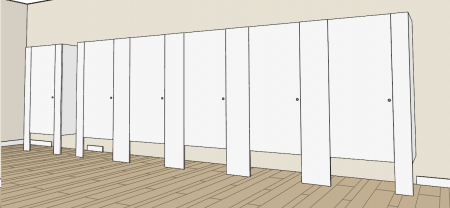
Depends- integrated as part of the door, custom door symbol, custom drawer box symbol, separations are a custom cabinet door placed as a side inset

Or as a metal channel? These were done with J channel but C can also be used (start with a molding to make the door symbol).
Adjust the Y origin and lock the height. The cabinets in this case used a traditional overlay. Takes a bit of playing around to get there.
Note- Perhaps can also be done with full overlay. Did these a long time ago so don't quite remember why but I had trouble changing to Full overlay just now
The sides were custom symbols Inserted in the back of the cabinet, left one exposed for reference.


I have some available for sale if need be. (while challenging, even frustrating, making them yourself is a good learning excercise)
-
11 hours ago, justnelson6 said:
I'm trying to recreate this end of island open shelving unit with drawers and 4 legs that my clients wants.
While I almost always try to do these sorts of things with a single cabinet in this case I found that was really annoying to make look correct in all types of views. So it's better to make it in parts.
Sides are made with a cabinet section and two legs, then convert that to a symbol. The main cabinet works better if the bottom shelf is a cabinet door symbol.
Set the upper layout of the cabinet front to avoid showing extra lines in vector when the sides are forced over.
Getting it to look correct in vector was a PIA when it is changed to a symbol so that it can go into a schedule. Attached a plan (only because too much to explain)
This has 3" legs set 1/2" proud of face frames. Changing that requires changing leg sizes, then a new symbol. And reset the sizing of the top front layout.

-
-
20 hours ago, PamelaT said:
Where do you convert the custom counter top to a wainscot panel?
Hi Pamela. First a tip. If you want someone to get notified to look at a post put an @ symbol"the user name" OR highlight some text in their post and select Quote Selection when it pops up. I just got back and the only reason I saw this was looking at what was posted since I left.
I almost never use solids for making a door symbol so I'm not sure how you would use the wainscot panel with that without just floating it in.
Here is a link to a post with the door maker plan I use. I may have updated it but this works.
-
1
-


 use
use


 Place a molding line using that.


PDF page bookmarks?
in General Q & A
Posted
I know Bluebeam (now a subscription) does it as I have it. PDF exchange might (a lot cheaper) With either check with them- BB for version but should be the basic, I don't know the exact capability of PDF eExchange but closest thing out there to BB and a fraction of the cost. Sending you a PM. (why the lskdfkldjf does the forum lag or not post half the time using Firefox)