

Dermot
-
Posts
2448 -
Joined
Content Type
Profiles
Forums
Gallery
Posts posted by Dermot
-
-
If you already have SSA, you should find X12 in your digital locker. If you don't have SSA, the cost to upgrade from X11 is $695 right now:

-
 1
1
-
-
"How can FORCE Chief to use more of my computers resources to speed it up?"
Your problem probably has nothing to do with how many resources you are using. The program will only use as many resources as it needs and you can't really can't force it to use more without actually slowing it down. If you are not using all of your memory then adding more memory will not speed anything up. If you are not using all of your cores, then adding more cores will not speed anything up.
The real problem is that the program is slow for you. The solution to your problem is to figure out what is causing the program to be slow. Assuming that you don't have any hardware or system problems, then problem is probably related to what is in your plan and what you are doing when it is slow.
If the program is slow when you are changing pages in layout, then posting the plan file will probably not help any one to figure out why it is slow. You need to post the layout, all referenced plans, and any other referenced files (like imported pictures or pdfs).
My best guess based on the very limited information that you have posted is that the main problem is your use of pdf files. If for example, you have imported a 25 page pdf file into the program and need to display just one page of it, the program still has to keep all 25 pages in memory and process all 25 pages every time you need to draw it. If you need to display all 25 pages and you import the 25 page document 25 times, the program then needs to process all the data 625 times. This is probably going to give you a huge performance hit.
If you were to split up the pdf document into 25 separate documents, one for each page, you would probably see a big improvement.
If your imported pdf only has images, rather than actual text or vector graphics, then the pdf will cause a performance hit because it does far more processing than just displaying the image directly. You should be able to convert your pdf into an image, with no loss of resolution, and see a large performance benefit.
Keep in mind that my comments are only based on a guess. There are lots of other things that you could be doing that might also cause performance problems. If all else fails, you might want to contact our technical support department for additional help.
-
1
-
-
If you want to turn off all patterns for the view, you turn off the layer. If you just want to turn off the pattern for the roof, you need to edit the roof material. Unfortunately, if you modify the roof material, then all camera views will be affected. I don't know of a way to turn off just the roof pattern for just one view but maybe someone else knows a trick.
-
Since it looks like you are going from X10 to X12, you might want to review both of these migration guides:
https://cloud.chiefarchitect.com/1/pdf/documentation/chief-architect-x11-migration-guide.pdf
https://cloud.chiefarchitect.com/1/pdf/documentation/chief-architect-x12-migration-guide.pdf
-
Try unchecking the Newel/Posts box:

-
 2
2
-
1
-
-
From your description it sounds like you are sending views to layout that are linked to a Saved Plan View. If you change anything associated with the Saved Plan View, such as the active layer set or the current floor, then this can affect your layout views. If you send multiple views to layout all linked to the same Saved Plan View, then they will all update any time you change something.
Here are some ways to solve your problems:
- You can stop using saved plan views by switching your Saved Plan View Control that appears in the default toolbar to "None". You can also do this in your default template so that new plans won't start in a saved plan view.
- If you are using X12, you can decide whether or not you want your layout box linked to a Saved Plan View in the Send to Layout dialog box. Just make sure the "Link Saved Plan View (name)" box is unchecked when you are sending.
- You can unlink a layout box from a saved plan view by opening the Layout Box Specification dialog and setting the Linked Saved Plan View combo box to "None". There is also an edit toolbar button that will allow you to link or unlink a layout box from a saved plan view.
- You can learn how to use Saved Plan Views. If you use a different saved plan view for each layout view, you won't have to worry about accidentally changing them. Saved Plan Views can greatly improve your productivity so that you can just switch views instead of having to change lots of settings all the time.
More information about Saved Plan Views can be found in the reference manual or in this video:
https://www.chiefarchitect.com/videos/watch/2421/saved-plan-views.html?playlist=100
-
1
-
-
I would highly recommend that if you purchase an older version from a private party that you first verify the version you are buying is a legal version and that the license can be transferred.
You might also consider on of the monthly rental options available. For more information, contact our sales department during normal business hours.
-
Those options are disabled unless you have an automatic flat ceiling for the room. If you have turned off the room's ceiling and are using manual ceiling planes, you can add your own holes to the ceiling planes. If the skylight finds an appropriate hole below it, it should build the shaft surfaces to connect the two.
-
1
-
-
Just as an FYI since Michael did a good job explaining the difference, the text in the help documentation is correct but the image is incorrect. In the future, please report any "bugs" in the documentation to our technical support team the same way that you would report any problems in the program.
-
If you are still having problems, then please contact our technical support team during our normal business hours for additional help.
-
The easiest way to see what your layout view is actually using is to open up the Layout Box Specification dialog. On the plan view panel, you will be able to tell if your layout box is linked to a saved plan view or not. If your layout box is linked to a saved plan view, any change to that saved plan view will also change your layout view. If your layout box is not linked to a saved plan view, then changes in your plan view will not be reflected in your layout. See picture below.
From your "solved it" post, it looks like your layout box is linked to a saved plan view. If your layout box was not linked to a saved plan view, then changing the reference display in the plan view would not affect the layout view. This also means that you should be careful that don't send multiple plan views to the layout that are linked to the same saved plan view. For more information about saved plan views, you might want to check out this video:
https://www.chiefarchitect.com/videos/watch/2421/saved-plan-views.html
Also, if you are using reference display as part of your construction documents, I would recommend that you turn off the XOR display. For some more information about the reference display settings, you should read my post in this thread:

-
I believe Joe and others are suggesting that you do a "save as" so that you do not write over the original file. This does not mean that the new file can be opened in the older version.
Just as an FYI, the program will automatically create a copy of the original file and save it in your archives folder when you try to save it in the newer version. If you ever accidentally open a file from an older version and then hit "save" you should get a message telling you that the program made this copy and where it saved it.

-
By default the program should automatically check for updates once a day. If you have turned this off or increased the time in your preferences, then you can always check manually using the menus: Help>Download Program Updates.
-
As Eric has pointed out, Annotation Sets have been renamed to Default Sets in X12.
If you are trying to setup the active defaults for the current view, I would encourage you to use the Edit Active View tool. This will bring up a view specific dialog box that should have a Selected Defaults panel that will allow you to modify everything you need. The picture below shows what you would get if you are working in a plan view.

-
1
-
1
-
-
Yes. X12 can open any plan or layout files written by Version 10 and newer which includes X1 through X11.
Once a plan or layout file is saved in X12, it can not be opened by any older versions.
I believe that you can rent X12 for as little as one month but you should probably contact our sales department directly for more information.
-
It kind of depends on how you broke it to begin with and what you did after that.
If the lines end points are already lined up, then you can just select a line and single click on the end handle. The lines should join into a single polyline unless any of the attributes are different or if Connect CAD Segments is turned off.
If the lines end points are not lined up, you could drag one end handle on top of the other (with snaps on) or use the Intersect/Join Two Lines tool.
If you are trying to get rid of extra points in the middle of a polyline, you can use the Simplify Polyline tool.
If you want to add a new line to close up an open polyline, there is also a Close Polyline tool.

-
1
-
-
"I hope that at some point in time CA gives us move spacing control."
You can hope all you want but it would probably be even better to submit a feature request too.
-
1
-
1
-
-
Do you have "Use Plan View Scale" checked?

-
We are not as big as some other companies so we don't currently have the resources to do this. You should always assume that there are no known issues and report any and all problems you find directly to our technical support team. And never assume that because something was mentioned in a random forum post that we will know about it.
-
More than likely, this is a problem with your video card or it's drivers. For more info see this help article:
If all else fails, contact our technical support department.
-
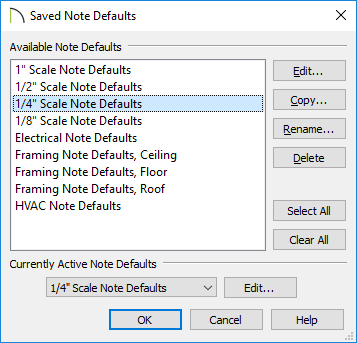
Note defaults can be used to control how notes are created when you place a new one using the Note tool. You can create as many different saved note defaults as you like in the same way that you can create different defaults for dimensions, text, markers, callouts, etc. The first picture below shows the dialog you can get to through the Default Settings dialog. Only one saved note default can be the active default for the current view which controls how new notes will be created. You can also set the active note default in several other ways including using the Edit Active View dialog or the Saved Plan View dialog.
Note types can be used to organize your notes in your note schedules. The program comes with some generic note types already setup (Bath Notes, Construction Notes, Electrical Notes, etc.), but you can create as many new ones as you like. When you create a note schedule, you can then specify that it will only contain notes of the specified type(s) that you want. The second picture below shows how you can choose which note types to include in your note schedule.
In X12, you can also create custom categories for organizing schedules that will work with all objects and schedules. These custom categories are more flexible than note types but are otherwise pretty similar.

-
1
-
-
Just to be clear, note defaults are not the same as note types.
You can create new note defaults in both X11 and X12 through the Default Settings dialog.
You can only create new note types from the Note Type Management dialog in X11.
You can also create new note types in the Note Specification dialog or the Note Defaults dialog in X12. Please take another look at the picture I posted above.
-
X11 abd X12 both have the Note Type Management dialog available in the text menu and toolbar.
X12 also has the ability to create a new note type directly in the Note Specification and Note Defaults dialog.X12's custom schedule categories really have nothing to do with note types.

-
Select the terrain perimeter and use the Make Terrain Hole Around Building tool to convert the automatic hole to a manual one. Then modify the shape of the hole as needed.
-
1
-


DOUBLE OVEN
in General Q & A
Posted
Just as an FYI, you can add as many appliances to a cabinet face as you like. You can't just drop them on the face from the library browser though. In the cabinet specification dialog, you have to select the face item, change it into an appliance section, and then choose the "Specify..." button next to the Appliance/Door/Drawer label.