

Alaskan_Son
-
Posts
12335 -
Joined
Content Type
Profiles
Forums
Gallery
Posts posted by Alaskan_Son
-
-
2 minutes ago, Renerabbitt said:
Sorry Mike, I didn’t mean that as a correction I know you knew that , just letting people know in case they were trying to do something else with the measurement before an output
Right. They would want to carry out any calculations before formatting. So, if you wanted to subtract an inch and round to the nearest whole inch....
%(room.ceiling_height-1.in).to_s("'-\",1")%
...and bonus tip if you want to round to the nearest whole inch and keep the trailing zero if it lands at a whole foot...
%(room.ceiling_height-1.in).to_s("'-\",1").sub(/'$/, '\'-0"')%
-
 1
1
-
 1
1
-
-
19 minutes ago, Renerabbitt said:
Great tip, and just for anyone's FYI this does output as a string, and is no longer a "measurement" class
True, but every solution to display as feet and inches is going to be in string form.
-
On 2/4/2026 at 8:24 AM, BrianSmith said:
Using preset macro "%room.height.ceiling%" to add ceiling height to Room Labels.
Does anyone know how to change this from inches to feet & inches?
On 2/4/2026 at 8:34 AM, Joe_Carrick said:Try this macro
- room_ceiling_ht_ft_in.json
- You might want to adjust the rounding within the macro. It's currently set to 1/16"
On 2/4/2026 at 8:40 AM, JonathanK said:This is the one we use for the ft-in:
...
If you're running the latest version of X17, there's a little Easter egg hidden in the software that will both convert to feet and inches ('-") and set the rounding precision. It looks like this:
%room.ceiling_height.to_s("'-\",16")%
-
2
-
1
-
Not sure what that "Item" column is because its not a Chief name. It's one that you must have renamed. I'm guessing though that it's the "Label" column. Check your object labels.
-
The .caproj file that gets exported when using the Export Plan as Project tool is nothing more than a special zipped folder. You can manually change the extension of the resulting file to .zip instead of .caproj
You can then unzip and access/edit all the internal files.
-
1
-
-
On 12/31/2025 at 12:15 PM, DBCooper said:
Unfortunately, your custom macro gives you an "error" for the non-pony walls but this might be something you can fix in your custom macro by having it just return 0 for these cases instead of "n/a".
Add a simple inline rescue to fix this:
%lower_layers[0].area.to_f.round(2) rescue 0%
-
1
-
-
Here's another method:
- Select Roof Plane and open Roof Plane DBX
- Copy the Pitch (in Degrees) and hit Escape
- Re-select Roof Plane and click Convert Selected to Symbol
- Uncheck Add to Library, check Show Advanced, and click Okay
- Navigate to 3D>Rotation, select the axis parallel to your baseline/perpendicular to your pitch, paste the Pitch value into the angle field, and click Rotate + or Rotate - to make the roof plane lie flat.
- Navigate to the 2D Symbol tab and either click Generate Block or select "Always". Click Okay.
- Click in a blank area of your plan to place a copy of your roof plane.
- Repeat for all other roof planes.
- Print as desired.
A couple quick notes:
- You may or may not want to save a temp copy of your plan to change the Eves Cut setting to Square, to remove Soffits, to remove Fasica, and/or to reduce oof plane thickness to help eliminate little extra edge details that might show up.
- You can optionally just work with the Generated CAD Blocks after the fact but I'll let you figure out the nuances of that on your own if you go that route.
-
31 minutes ago, Chrisb222 said:
Quite a while back I saw a discussion about how to use an orthopedic camera to view a projected roof plane in 2D. Think it was @Alaskan_Son
Maybe try a forum search.
Yeah, I think I made a video about it several years back. I basically did as @DBCooperdescribed with a few minor tweaks. It's mostly just about perfecting the process and being methodical about repeating. Can go pretty quick. I don't recall the most efficient method of how to consolidate a single roof plane. I don't recall putting them all on different layers though. Anyway, the most Most notable time saving thing I would recommend right off the top though is this:
Copy both the Pitch and the Baseline Angle from the roof plane DBX and then paste into the Camera's Positioning fields. There are a couple different tricks you can use to copy and paste multiple values into multiple fields, but if you're using a Windows machine and have Clipboard History activated, you can simply simply select each value from the Roof Plane DBX one at a time, hitting Control + C to copy each time, and then back in the Camera DBX, hit Windows + V to select which value to paste into the appropriate field.
-
- Create 5 side by side windows that are all the same height (height of the center unit).
- Group select the windows and block them.
- Give the Mulled unit an Arch (Broken Arch)
- Adjust as necessary.
-
1
-
2
-
7 minutes ago, JKEdmo said:
Thanks for explaining this. I've had the case where two windows that were identical except for their muntin patterns were being scheduled as the same, which confused me. As soon as I added the muntin / grid column to my window schedule they scheduled out as separate.
Yeah, on that note, unfortunately 3D view columns are the one area where Chief doesn't recognize unique attributes. There has to be something different in the text. I would recommend sending in a complaint/suggestion on this if you want to see this behavior changed.
-
1
-
-
1 hour ago, JordanWeed said:
Thanks! Now I wonder, is it possible to group specific items together, while leaving other items ungrouped? Ex. I want the base cabinets be separate, but I want the molding to be grouped together into one item/multiple qtys.
In addition to the option @robdyck gave you, you can also leave Group Similar Objects checked and force the items onto individual rows by making something unique about them. The thing to understand is that schedules group items that are identical based on what is being displayed in the schedule. Here's a simple example:
Standard schedule with items grouped:
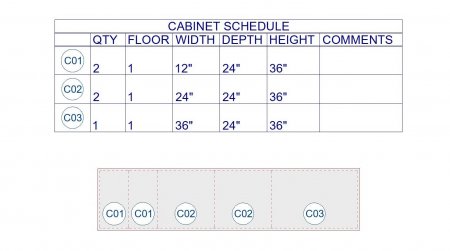
...and here's what happens if I remove the width column:
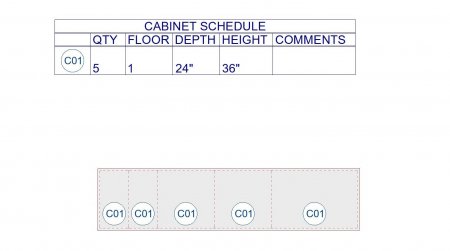
So, if you want to force certain items from not grouping together, make sure to include a column that is reporting some unique attribute for the desired object(s). This may be a Room column, a Label column, a Description column, or, it can even be as simple as using the Comments column and adding a unique column. In this example, all I did was add a single space to the Comment field for one of my 12" wide cabinets:
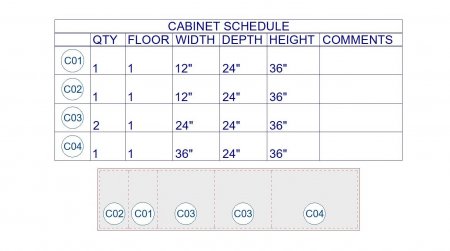
-
2
-
1
-
-
This should be moved to General Q&A, but all you need to do is toggle your "Patterns, 3D Views" layer in that specific layer set.
-
20 minutes ago, JordanWeed said:
@Alaskan_SonI made a layer set TEST that only has Cabinet, Labels displayed w/ invisible line. I inserted the TEST set above, label is still hidden by wall?
3 Things:
- You need to have both the object layer and the label layer turned on in your new layer set. Turning the object off also turns off the label. The label you're currently seeing is probably the label from the layer set below. While we're on that subject...
- I failed to mention this in my first post, but you should probably turn off the cabinet labels in the layer set below.
- Uncheck XOR in your new referenced floor.
-
1
-
There's another option that can work quite well but that can be tedious to initially set up. That is, use your Reference Display. Here are the basic:
- Decide which objects need their labels moved forward.
- Create a new Layer Set that has only those objects and their labels turned on, and set the line style for all those objects to the Invisible line style.
- Use the Reference Display settings for your current Plan View to add a new Reference Display to the TOP of the stack using that new Layer Set. Set it to use the same floor you are already trying to display, and make sure both Details and XOR are toggled OFF.
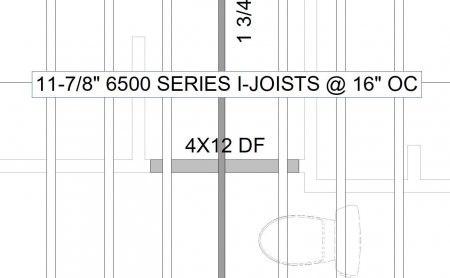
This will place all your desired labels in the top drawing group without displaying any additional lines or fills for the related objects. Here's a quick example where I have a header label obscured by joists above. In this case, I couldn't relocate the label because I want to leave automatic framing turned on, and even if I could have, the direction of the joists above would still be obscuring it...

-
2
-
1
-
19 hours ago, Michael_Gia said:
If you do "extensive" work in text macro management then X17 will blow up and randomly delete and/or be unable to save. (see below, not that extensive, but obviously too much for X17)
Even with a file that I had worked on and saved multiple times in X17, it decided to flash the warning, "if you save this file in X17 then you will not be able to open the file in older versions"
When I saw that, I clicked continue only to get the message pop again and again.
I decided to quite since I had been saving multiple times as I went and I knew there couldn't be much info missing.
When I reopened the file all the text macros that I had used throughout the form I was working on vanished.
The Marco list was still in Text Macro Management, although with info from a much earlier version.
It even went into the archives for X17 and overwrote prior backups, it seems. Because I tried to at least restore the Text Macro List from an earlier version that was more complete and it wasn't.
I'm ready to put my fist through the monitor.
Is this a bug in X17?
I've never used text macros extensively only a few here and there.
Have Text Macros always been wonky and you all have chosen to keep it a secret?
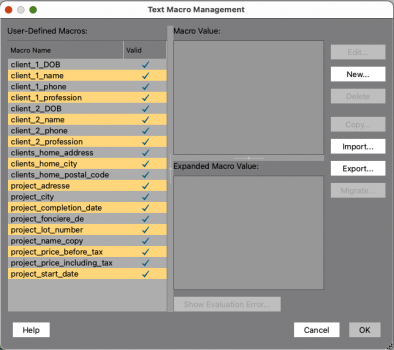
Never seen anything like what you're describing. The only thing that comes to mind is that it sounds like you may be inadvertently working with multiple plan files.
-
2 minutes ago, tundra_dweller said:
Does anyone know where the framing display option for plan view (line vs. box) went in X17? The help file says the setting is in automatic framing defaults, but I can't find it there or anywhere else.
Its in the General Plan Defaults now
-
If you're using a closed polyline, then %length% will not be an option. As @DBCooperalready stated though, you can use %perimeter%. The problem though is that you're going to get the entire perimeter of the polyline and not necessarily the length of the pipe that the polyline is supposed to be representing. Assuming though that your "pipe" is a specific width and that and that its a pretty consistent width closed on both ends, then you should be able to use something like the following:
%((perimeter.round-8.in)/2).to_s("\'-\"")%
...where the number 8 is just double the width of the "pipe"...
NOTE: I rounded the perimeter value just to avoid a more complex fractional inch value macro but this should work for a basic length. Just make sure to replace the number to reflect the actual width of your pipe.
If you need anything more complex or need things tweaked further, please feel feel to reach out. I do offer consultation services for this exact type of thing.
-
1
-
1
-
-
That behavior is controlled by the Text Style being used for your North Pointer's Layer. Edit the Text Style so that it is set to Rotate with Plan. If you need that setting unchecked for something else, then create a NEW Text Style and set it to Rotate with Plan.
-
1
-
-
25 minutes ago, SHCanada2 said:
....which is why I thought if we could actually write to the text based macros, with a macro, then it is one and done.
I agree. This functionality would be awesome.
-
I have my own systems for creating custom project information "fields". Information is all entered in a single location in the plan or layout file, custom fields can be created on the fly, and I don't use globals anymore. That being said, I'm a little curious why more people don't just use plain old non-evaluated text macros. Its a very very easy way to create custom fields that can be exported/imported as well.

-
1
-
-
Control+Tab followed by Enter is a good alternative.
-
2
-
-
1 hour ago, chiefjone9 said:
I totally get your frustration—I'm also using Home Designer Pro and often hit the same wall when features are only in Premier. I haven't found a way to reshape stair handrails in Pro either, just balusters and newels like you mentioned. I usually search with “Home Designer Pro only” plus the feature name on both YouTube and this forum. Would love to know if anyone else has a better search method!
honestly, the best method is to avoid using this forum unless absolutely necessary, and just stick to the Home Designer forum. -
Use the HomeTalk forum instead…
-
12 minutes ago, OGDesigner said:
Alaskan_Son, This is brilliant and worked like a charm! Is there a reference to writing these operators?
Me!
Joking

Okay, Not joking
 ...
...
Its tricky because you have to use both Ruby (programming language) and Chief which are 2 entirely different and separate constructs. You can use any number of online resources to learn how to program in Ruby including the actual Ruby documentation, the StackOverflow forum, and even ChatGPT...
...But then you also have to learn how to use the various tools that Chief has given us to work with. This is where it gets tricky. There is a lot of nuance and interplay between the 2. We have certain information in Chief that we can access and parse, various ways to access and parse that information, and some (but not all) of those ways can optionally use Ruby. Chief has quite a bit in its documentation about built in name:value pairs, special built in Classes and Methods, and other text macro stuff, but has very little about actual Ruby programming (and rightfully so).
If you're serious about custom macros and otherwise using Ruby to access and parse information in Chief, it is well worth the effort to pay for an hour or 3 of consultation/training time. You'll save yourself many hours...days..even weeks of otherwise unnecessary experimentation.
-
1
-


 ...
...
Components panel information
in General Q & A
Posted
Depends on exactly which data you want, but the short answer is yes. For the example above, you can use some relatively simple code like:
upper_layers[0].material_data.quantity.to_cu_yd.round(2)
It gets much more complicated though if your wall has multiple layers.