

CBuserIndia
-
Posts
55 -
Joined
-
Last visited
Content Type
Profiles
Forums
Gallery
Posts posted by CBuserIndia
-
-
We are spending about 20-25 minutes to render single view. My team has got in to habit of completing design work & towards end of the day, keep 10-12 views for render. We use Standard Ray trace inbuilt inside Chief Architect Interior version.
Not all machines/config are same. Typical hardware we have is : Intel i5 3rd Gen CPU, 8GB RAM, 1 TB Hard drive, 2 GB Intel graphics Card
Thanks
Nitin
Nitin,
My PC sometimes requires about ten or fifteen minutes for professional looking renders using its Ray-Tracer function. What software do you have? What is your PC hardware like?
DJP
-
Thanks for suggestion, will give a try
You could check out this program. I don't have any personal experience with it, so I can't say if it works as advertised.
http://www.ampsoft.net/utilities/WinOFF.php
I use an app with similar features on my Macs called 'Amphetamine
-
This, very likely, is not Chief Architect question, however if you guys have any tips for me, it will help alot.
We keep multiple views for rendering over night time. These usually get over in couple of hours time. Say for example my rendering will go on for next 5 hours. However I force my laptop to stay awake for whole night.
How do I make my laptop go-to Sleep after rendering is done.
Right now I am using Power option >> Sleep >> "Never" in windows settings.
We have multiple CA Interior 8 licenses. My team uses laptops with windows 8 & some with windows 10.
Please if you have any smart tips for my laptops to go sleep after work is done. How do you guys handle this situation ?
Thanks for help
Nitin -
For First room - Ray trace rendering is in progress. This is going to take few minutes
Now if I want to quickly render new image (new room) I am presently working on to check if it looks OK. Is it possible to pause the ongoing rendering. Do a quick pass on new room & then again continue the first room rendering which was paused.Is something like this possible, or I have to wait for all rendering (on-going & scheduled) to get over & only after that I can try rendering on new one.
Thanks
NitinChief Architect Interior - X8
-
Perhaps the easiest way to get a full kitchen dimensioned would be to use auto dimensions- (NOTE-I don't like the NKBA auto dimensions since you can't control anything AND they are available in Interiors
but auto-elevation are not bad.
To have the vertical dimension be next to the cabinets in a view that spans rooms as yours does-
- you can use a back clipped section instead of a wall elevation.
- Set your defaults to locate what you want, be sure to look at what structural elements the default is set to include- you won't want them all. Then pick a side for the dimensions.
- Open the dbx for the view and check clip to sides, drag the sides of the camera in until the view just includes what you want dimensioned, then click auto elevation dimensions.
- You can then go back and revert the view to the width you want and the dimensions will stay where they were when in the side clipped view.
- If you need more vertical dimensions in another area repeat the process in another area.
- If you need dimension to wall you drag the extra little diamond over.
There is no way around having to change default settings for "locate objects" in the interior version. Auto Dims do eliminate the pesky message box but I've gotten used to it when doing manual dims.
With Premier you can use annotation sets to have varied "locate objects" settings for manual dimensions but not for auto. Annosets are a big reason I upgraded to premier. Might be worth downloading a trial version AND reading up on what they do (especially in the forum) to see if it is worth it. For a while I had one Premier license and one Interiors seat-we just dimensioned in Premier. There are other advantages to working in Anno-sets though so I upgraded the second license.
Hello Mark
Thank you so much for all help. We are going through suggestion & try to come up solution within Interior version for now. Your pointers have made us discover many new points. It will take 2-3 days for us to learn & implement.
One silly question, what is dbx ??? does it mean dialogue Box ??
I am thinking if I can create a new "Layer Set" which displays only items I want in Elevation & use it as default for Elevation view, it should help to speed up things.
I will update you again later this week with progress & might need more help.
I have seen Annotation related video & I understand how impressive/useful feature is but for now, I am sticking to Interior version & see what best I can do.
Thanks again
Nitin
-
All designers in my team end up spending 10-15 minutes in giving dimensions on 2D elevation for a single room (~ 4 walls Elevations ). I have feeling that there should be way easier option / process to handle this task.
We use Chief Architect 8 - Interior version.
I have created a sample Video (4 minutes) of how I go about giving dimensions . Can you guys/experts PLEASE PLEASE go over & tell me how can I make it more efficient. Measurements are there, it shouldn't take so much time to label them. We struggle so much in picking center point.
Please go through this video & if you can share some better way of doing same.
(pls mute video, has lot of background traffic noise)
-
Sorry for the tardy response CB. The image on the left is a symbol
of the false ceiling that I saved to the User Library. I made the shapes
out of p-solids and solid subtraction (or maybe it was Hole in Polyline
Solid). Once you have the shape you want take a 3D view with only
the shape in it (nothing else). Then from the "Tools" drop down menu
select "Symbol" and then "Convert to Symbol". Once you have the
Symbol you can resize it to fit any shape room by dragging the edit
handles. That is what is pictured in the thumbnail. There is no doubt
that all that indirect lighting takes a heavy toll on Ray Trace time. As
a workaround I put all the indirect light sources on their own layer
(Lights, Indirect). That way I can turn them all off as I work with the
rest of the image. I believe there are 226 indirect light sources in the
scene along with the 8 additional lights in the room.
I had a play with it over the weekend. Here is a recreation of one of
your thumbnails done entirely in Chief with standard Library content.
Well, actually I made the armchair in the foreground and the end table
lamps. It was a case of it was easier to make 'em than it was to fake
'em. I basically concentrated on the ceiling effects and didn't do any
adjusting to the lights in the room. It could use some more passes
(I think this was 40 passes) to smooth out some of the graininess but
it should give you an idea of Chief's capabilities.
Hello Rich
This is extremely impressive! All Designers in my team are discussing your suggestion. Over this week we will make similar symbols & give a try. Thank you so much for all hard work!
We tried making blocks of previously done ceiling - did not think of making symbols. Your solution definitely helps, will work in our case.
Thanks
-
I am super confused about inserting / importing images inside layout.
For example
I have a picture image-test.jpg, 1200 x 840 pixel . image attached.
If I open new layout & insert image-test.jpg. FILE->IMPORT->IMPORT PICTURE (BMP,JPG,PNG)
As seen in 1.jpg, image is overlapping label box of my layout.
In a fresh new empty layout, if I zoom out one level. Layout window looks small in size, check 2.jpg
Now if insert image-test.jpg here, it overlaps complete layout, see image 3.jpg, infact image-test.jpg is almost double the size of layout window.
I am aware that it is possible to pull/push corner & re-size image, so that it fits in to layout window, but is that right thing to do ?Do I loose quality/clarity of image if I re-size it to fit in-to layout size ?
What is best practice of importing picture into layout window?


-
@joey_martin - Thank you Joey, we have started experimenting with watercolor.
@Alaskan_Son - Thank you for detail description! This really helps! -
Is this the type of thing you are looking for?
You might want to check out these videos
for some construction and lighting tips.
https://www.youtube.com/watch?v=MnL84X-y0UQ
I have gone through Scott's video on Ceiling Design Option. We use same technique to design our ceiling today. (except for lightings, it takes heavy toll on rendering if I put those many lights)
What I wanted to find out if I can re-use these designs. If a new room needs same design, it should be possible to re-use atleast soem part of it. Make it a reuable object/block/symbol/??? that can be pulled again. Modify it as per new room size, it continues to carry settings for good rendering, and you save time.
Second Video is also helpful.
Rich, what is the thumbnail/image ??? Are these blocks ? What exactly have you done here ?
-
If you are only looking for look not framed I would use poly solids saved in library and then stretch for different rooms. By adding to the library each time you will eventually get a good selection.
started experimenting with Polyline solid. Thanks! We use sofit a lot right now.
-
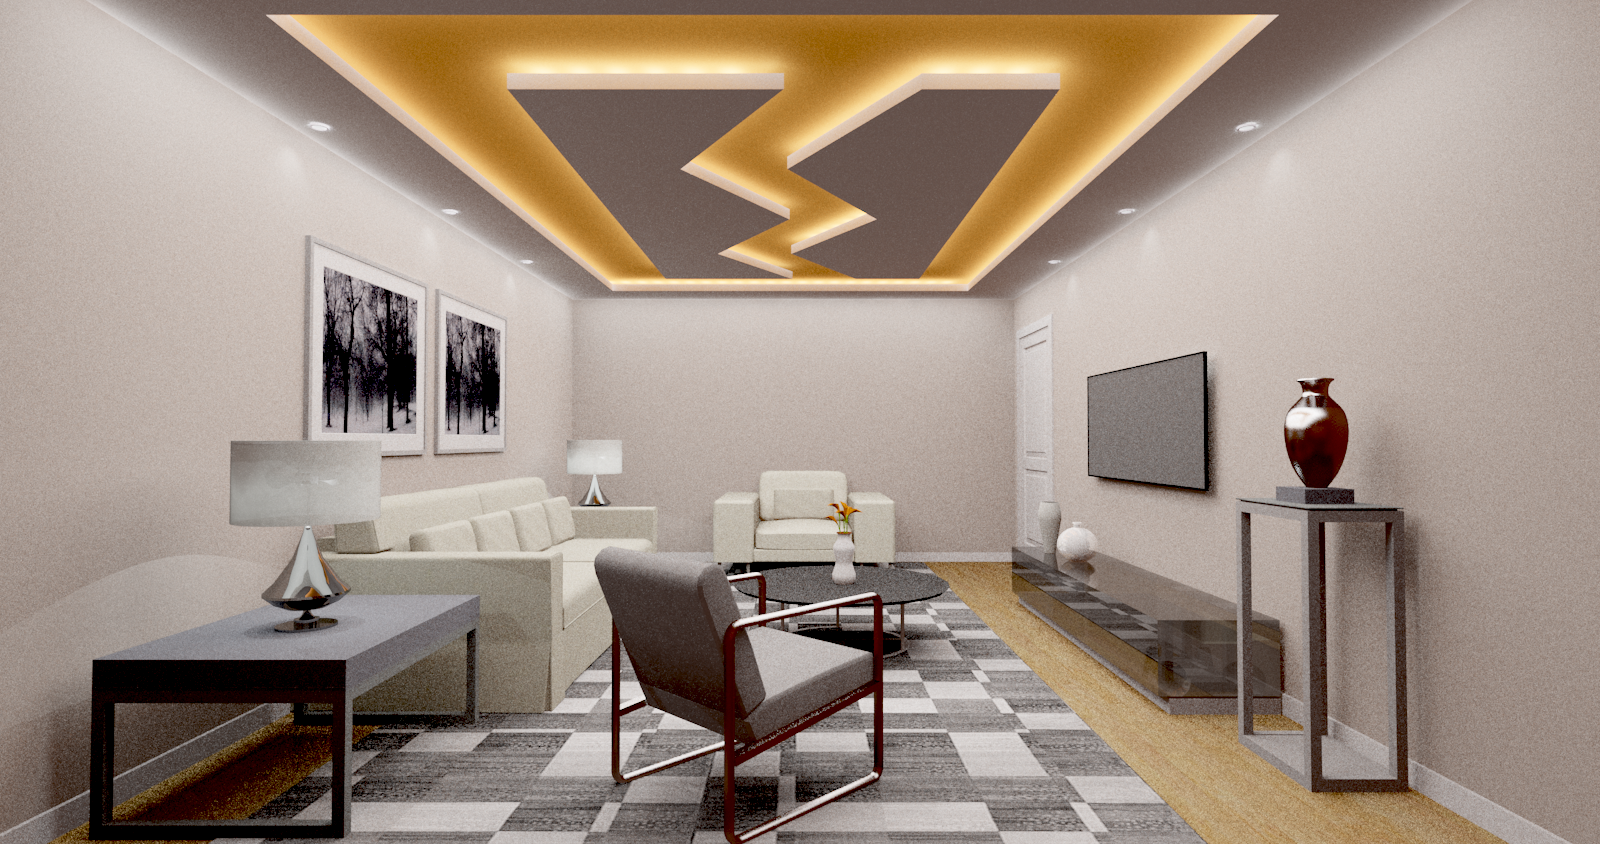
Almost every room we design gets a false ceiling. These are made from gypsum board material with aluminum framing to hold ceiling to true ceiling. Recessed LED lights are installed in them. Indirect lights are put inside coved area.
I am attaching some photographs of false ceiling examples (not done in CA)
Inside CA, I make these kind of false ceiling designs using Sofit & Polyline.
Lot of these designs keep getting repeated, I wanted help to figure out
1) Is there any alternative option to make these kind of ceilings ?
2) How do I make reusable blocks/symbols ? If room size changes, design adapts itself.
my starting idea is that if I am able to define/defaults (width, stretch from center, keep a fix offset distance from surrounding wall) .
Can you guys please guide ? Apart from that it is false ceiling, all I am trying to do is creating re-usbale 3d blocks/symbols which adapt as per room size ?


-
Thank you Dennis_Gavin and Designsyko for guidance. I will use Glass house & Duo-tone in next few projects & get feel of it.
Thank you once again! -
Hello All
I have been using Standard rendering & getting work done.
However I am not sure significance of other rendering techniques :
Vector View
Glass House
Duotone
Technical Illustration
Painting
Watercolour
Line Drawing
Yes, I already gave a try & saw what happens in above options. But what I am not able to understand is - value of these techniques.
When & where do you use all these rendering techniques, what benefits it will give to my clients ?
Please guide -
Thank you Graham , Gawdzira, Drawzilla
Hello Graham, I am attaching few rendered images below.
Gawdzira - can you please help me point me to video you are talking about.
Drawzilla, I agree, ray tracing is best way. As mentioned, earlier I am struggling with these ready objects which I am not designing, just pulling & placing in my rooms.
In attached image, Chair & Lamp look very un-realistic to me.
-
Started using CA-INTERIOR 5 months back. Quality of rendered 3d Image has improved. There is still scope of improvement.
One thing I have come to realise is - ready furniture /objects that I pull from library - specially Chairs , lamps placed on table, other furniture like dining table - these tend to look unreal after rendering is done.
Lately in all my 3d rendered images, most item look good ( towards realistic ) but chairs.
So far for chair, I have used ones made of wood & with fabric - may be I need to try other material.
I also (desperately) thought of not using chairs & lamps inside CA at-all. Once image is rendered, I will edit image & overlap/past some realistic chair image with transparent background. However this will not work when I want to show same room from different angle.
You guys have any suggestion please.
-
Thank you michaelgia, live video is nice idea for in person meeting, I will definitely try next time.
I will try spherical backdrop option & see how it works, but I really do not have panoramic image.With backdrop images - we wanted to take real location photograph & then use it inside design. How do you handle such images.
-
Thank you guys for all ideas. The projects I undertake are usually single level/floor with multiple rooms. Each designer creates separate rooms. We define walls of a room & then most work is of interior. There is no complete plan of the house, everyone has separate rooms. I wanted to know if there is easy way to merge these rooms in to single project once they are ready.
-
Thanks LinLMI for suggestion!
-
I run a Interior Design studio & we design multiple homes every week. We deliver Interior design only ( no exterior elevation). Every time we get project we split house among multiple team member ( 2 or 3 designers ). If there are 15 rooms in all, each takes up 5 or more rooms.
Each designer takes separate rooms & completes it. We deliver separate rooms to end customer, all reports, walkthroughs, images & plans are kept separately ( room-wise).
Do you guys have any suggestion on how I can eventually merge all rooms in to single plan ? or in case you have any suggestion on what can be better approach if multiple people are completing a project.
Thanks
-
Need help with settings of Ray Trace.
On the attached image, I have done quick mode 10 passes. Color of the wall given is white, but in rendered image it looks grey (doesn't look pure white). Also any other setting recommendations that can improve result.
I am also attaching settings used for ray trace.
Thanks


-
I need help with the backdrop image or the external view image (view which is seen out of window).
If you check sample video walkthrough (youtube link), when my camera moves through room, the outside image(view from window) looks un-realistic, it moves rapidly. It doesn't look proper.
https://www.youtube.com/watch?v=H8-EjOgiS5g
Image which I have used for outside is also attached in the thread. Also attached settings screenshot.
Can you please help me find out what is wrong here ?
Thanks


-
Thank you tommy1 & TheKitchenAbode for suggestions!
Tommy1 - yes symbol allows me to do exactly what I was looking for. Thank you for your help!
-
On exploding, each object becomes independent. If I change size of cabinet, shutter doesnt change.
However same thing when I do with wardrobes i have imported from 3dwarehouse website, they work fine. On double clicking, you get to change dimension & whole wardrobe changes/adapts the new size.
Thanks


Put windows to sleep after Rendering done
in General Q & A
Posted
Thank you Graham, that sounds good.